
Tutorial
The complete reference: every page, every line of the payslip, and the whole employment lifecycle.
EldeRem is a payroll application for full‑time, live‑in caregivers of elderly people in Israel. It helps an employer — usually a family member of the patient — set up the employment, agree the pay and lawful deductions, keep everyone’s identity and bank details in order, produce a lawful monthly pay slip, track what is being set aside for the worker’s future, and settle up correctly when the job ends.
This manual walks through the app the way you actually use it. Read it front to back the first time, then use the Table of Contents to jump back to what you need.
A note on the numbers. EldeRem’s statutory figures — minimum wage, the deduction ceilings, the contribution percentages, the recuperation rate — are entered as dated reference data and are still being finalised. Treat the amounts as a well‑organised, illustrative calculation, and check figures that matter against the current official rates. The workflow this manual describes is the stable part.
The example in the screenshots. Every screen below comes from one worked example: David Cohen employs Olga Ivanova, who lives in and cares for David’s mother Sarah Cohen, on conditions filled from the statutory minimum. The early screens follow that employment from signup to its first payslip; the later ones show it a few months in, so the accrual and history screens have something to show.
Table of Contents
- What EldeRem Does
- Key Ideas in One Page
- Creating Your Account
- Finding Your Way Around
- People — Your Contact Book
- Creating an Employment
- The Conditions — Setting the Terms
- Signing and Activating
- Understanding the Money (Every Line Explained)
- Running Payroll — The Monthly Payslip
- Recording the Payment
- National Insurance (Bituach Leumi) Payments
- Accrued Benefits — Vacation, Recuperation, Severance, Pension
- Ending an Employment — Termination and Final Settlement
- Payments History
- Inbox
- Settings
- The Tutorial
- Simulation Mode — Practice Safely
- Your Account
- The Whole Lifecycle at a Glance
- Glossary
- Tips and Troubleshooting
1. What EldeRem Does
A family in Israel employs a full‑time, live‑in caregiver for an elderly relative, and someone has to run that employment correctly — month after month, in a language they are comfortable with, without becoming a payroll expert. That situation has parts ordinary payroll apps ignore:
- the worker lives in the home, so accommodation, meals and utilities are deducted within legal caps;
- pay includes rest‑day premiums and holiday pay;
- the employer owes national insurance, pension, severance, annual leave and recuperation — some paid monthly, some set aside and paid at the end;
- there is a visa, and there are agencies and government forms;
- and everything must be reproducible and explainable in Hebrew, Russian, English or Uzbek.
EldeRem walks you through all of it. It keeps a record of the people and the employment; computes each month’s payslip and shows the arithmetic; tracks what is accruing for the worker’s future; helps you record national‑insurance payments; and, when the job ends, produces the final settlement — everything owed, netted into one closing payment.
It does not move money for you. You make the actual bank transfer; EldeRem records it and keeps the paper trail.
2. Key Ideas in One Page
A few ideas recur everywhere. Learn them once and the rest reads easily.
People have roles. The same Person record can be an employer, a worker (caregiver), or a patient (the person cared for). Your own profile is a Person too. You create people once and reuse them.
An employment ties three people together — employer, worker, patient — plus the terms, and it moves through a lifecycle: draft → active → terminated.
Conditions are the terms — salary, deductions, region — signed and dated. When terms change, you add a new span rather than editing history; the spans laid end to end cover the whole employment.
Draft vs. finalised. An employment and its terms start as an editable draft. Once signed, the terms are finalised, a point‑in‑time snapshot of everyone’s details is frozen for the record, and the employment becomes active.
A payslip is one month. You prepare it, review it, and record the payment. A paid payslip is immutable.
Some money is paid now; some is set aside. Wages and premiums are paid this month. Severance, annual leave, recuperation and pension accrue and are paid later.
Earned vs vested. For the set‑aside benefits, earned is what has built up; vested is what the worker would actually get if the job ended today. Some benefits only vest after a waiting period (a year for severance and recuperation, six months for pension).
The final settlement is the closing payment when the job ends: vested benefits plus any deferred adjustments, netted to one total.
Simulation mode lets you practise all of this with fake data first.
3. Creating Your Account
Choose your role and sign up
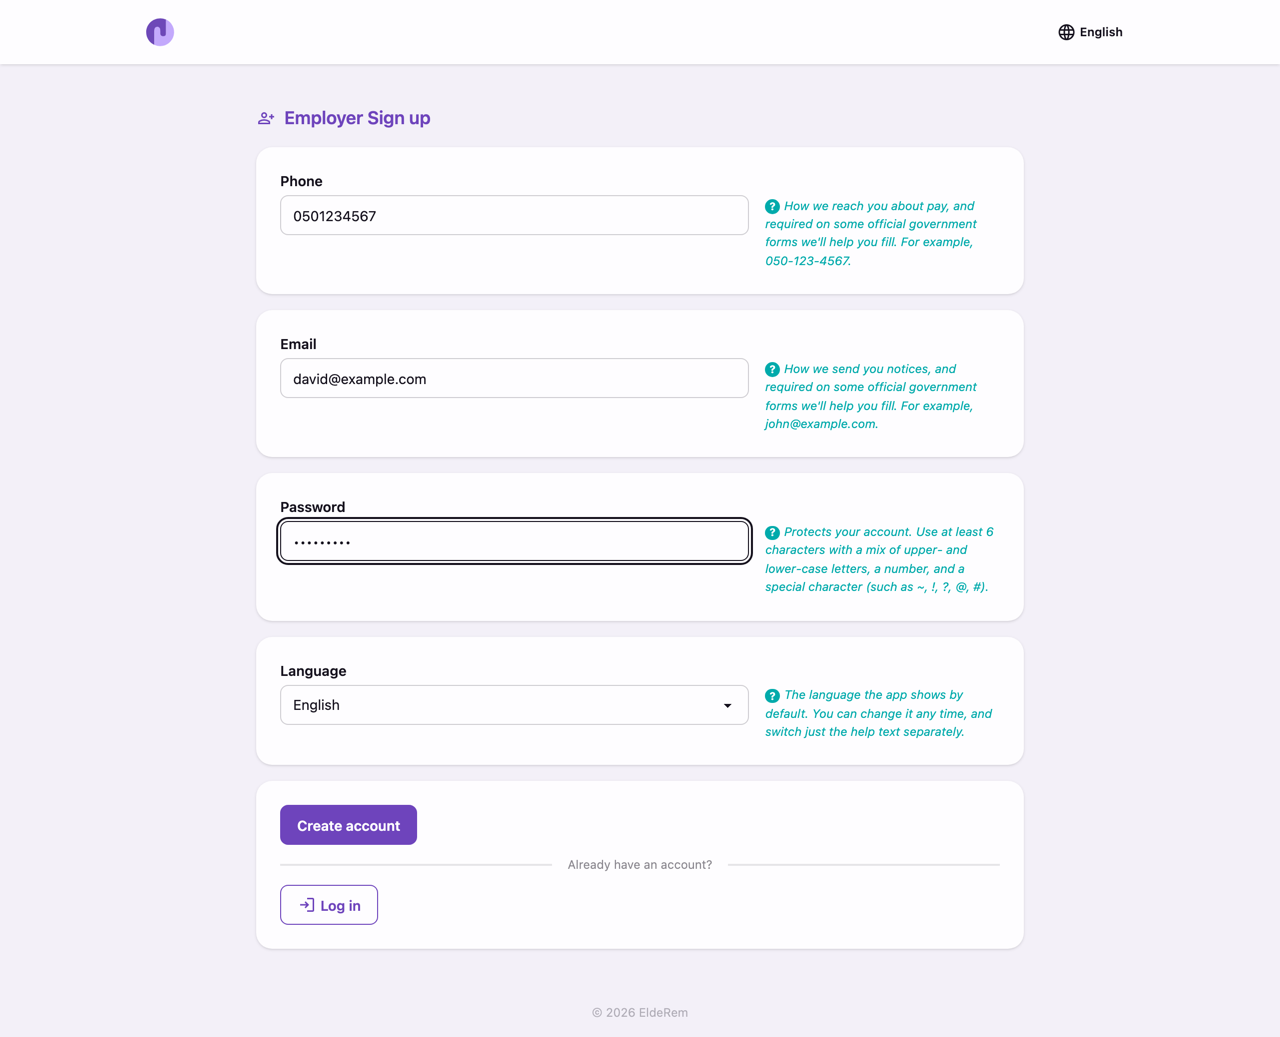
EldeRem has two kinds of account: Employer (the family member running the employment — who most of this manual addresses) and Worker (a caregiver who keeps their own copy). From the landing page, choose your role and fill the sign‑up form:
- Phone and Email — register with either or both, plus a password. You can later log in with either identifier; they are normalised, so small formatting differences do not matter.
- Language — Hebrew, Russian, English or Uzbek. This sets the whole app.
Press Create account; you are logged in and land on your Workspace. Your name and other personal details are filled in afterwards, on your own profile.

Logging in and out
Log in with your email or phone plus your password. Log out from the sidebar. The language switcher at the top is always available.
4. Finding Your Way Around
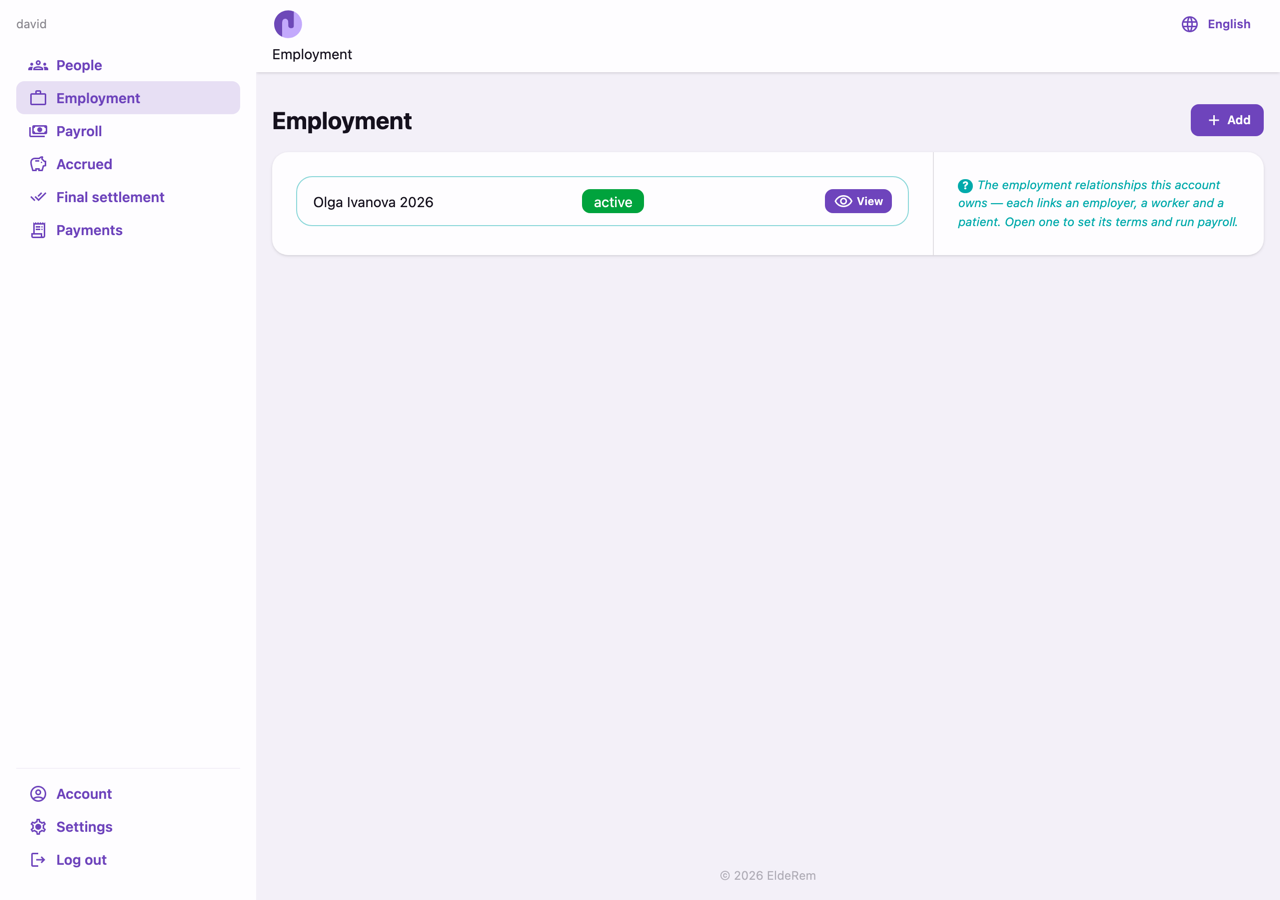
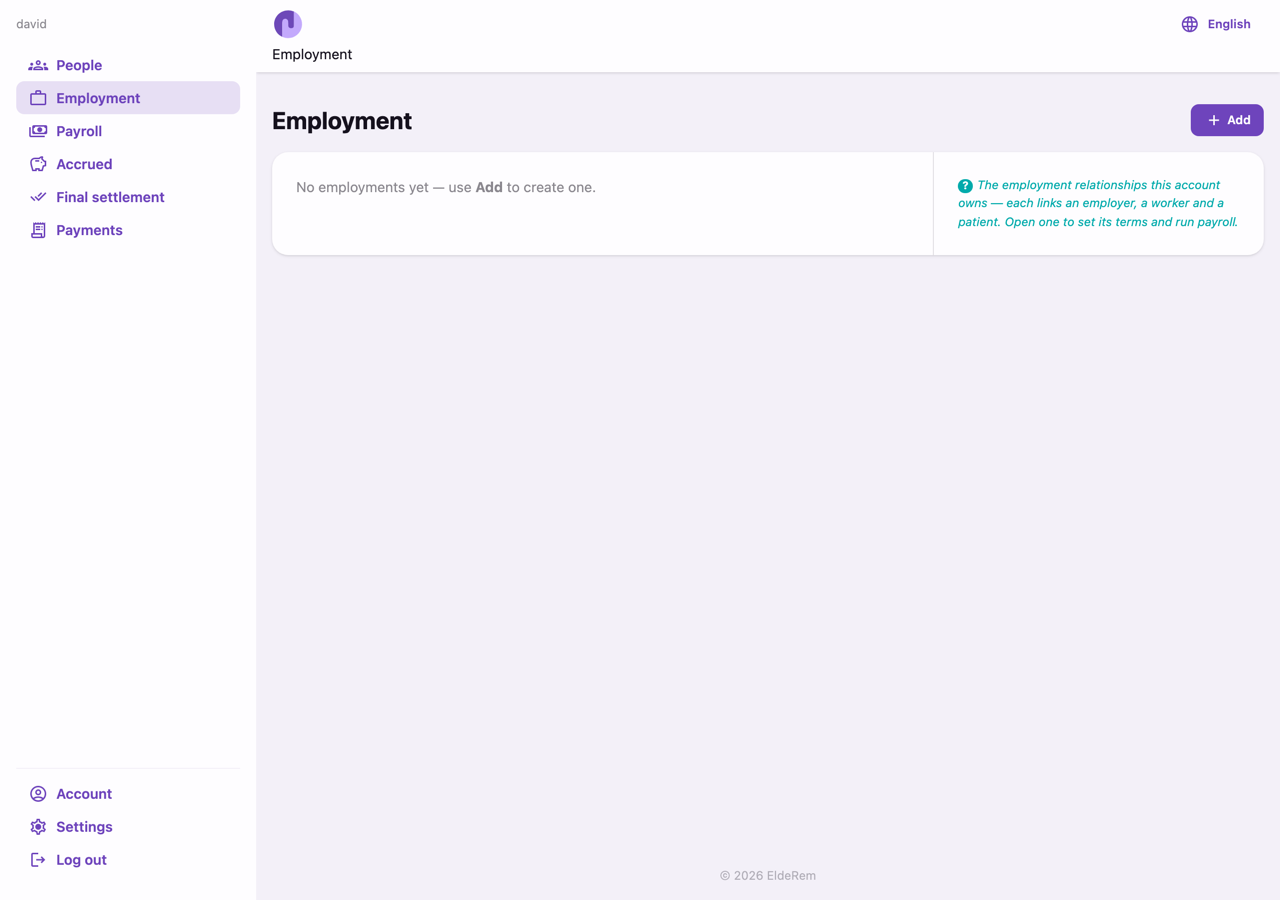
The left sidebar is the main menu:
| Item | What it’s for |
|---|---|
| People | Your contacts: workers, patients, and yourself. |
| Employment | Create and manage employments; sign terms. |
| Payroll | Prepare and pay the monthly payslip; national insurance. |
| Payments | The history of everything you’ve paid. |
| Inbox | Messages and reminders. |
| Settings | Preferences, language, help, advanced tools, statutory data. |
| Account | Your own details, policies, and logout. |
Two things to know immediately:
- Cards fold. Information is grouped into cards; many collapse to a one‑line summary via the fold button in their header, which keeps long pages (like the final settlement) tidy.
- Help text and the Tutorial. Most cards carry a small ”?” help note (toggle all of it in Settings), and a dedicated Tutorial explains the trickier payroll ideas (Chapter 18). Breadcrumbs at the top show where you are and can be hidden in Settings.
5. People — Your Contact Book

Open People. You’ll see your live contacts and, lower down, any Archived contacts — people captured into a past finalised employment and kept for the record.
Add a person
Click Add and choose the role — Worker or Patient. (The employer is usually you.) You are taken to the new person’s page to fill in the rest.

The person page
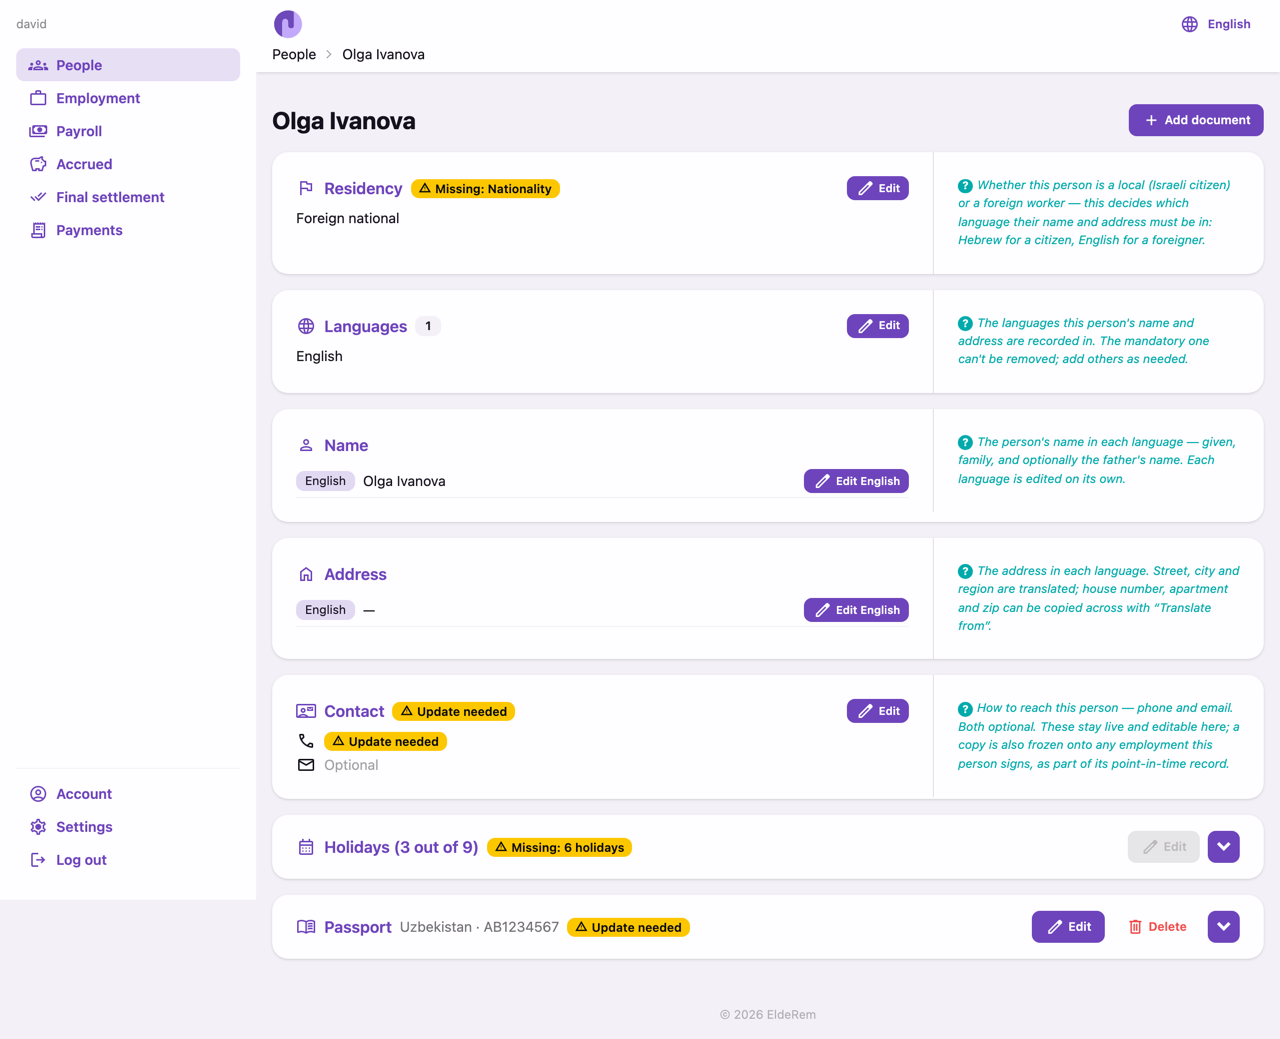
A person’s page is a set of cards, each with Edit and a status badge that becomes an “update needed” flag when something important is missing:
- Residency — Israeli citizen or foreign national. For a foreign worker you also record nationality (which decides the holiday calendar).
- Languages — the languages this person’s name and address should exist in. The official language (Hebrew) is always required, and for a worker, passport English.
- Name — edited per language, each on its own page, because a name may be written in Hebrew on one form and Latin letters on another.
- Address — also per language. You can Copy from another person, or Translate from this person’s address in another language (copying the house/apartment/zip that don’t need translating).
- Contact — phone and email. For your own account these double as your login identifiers, so changing them asks for your current password.
Documents
Use Add document to record:
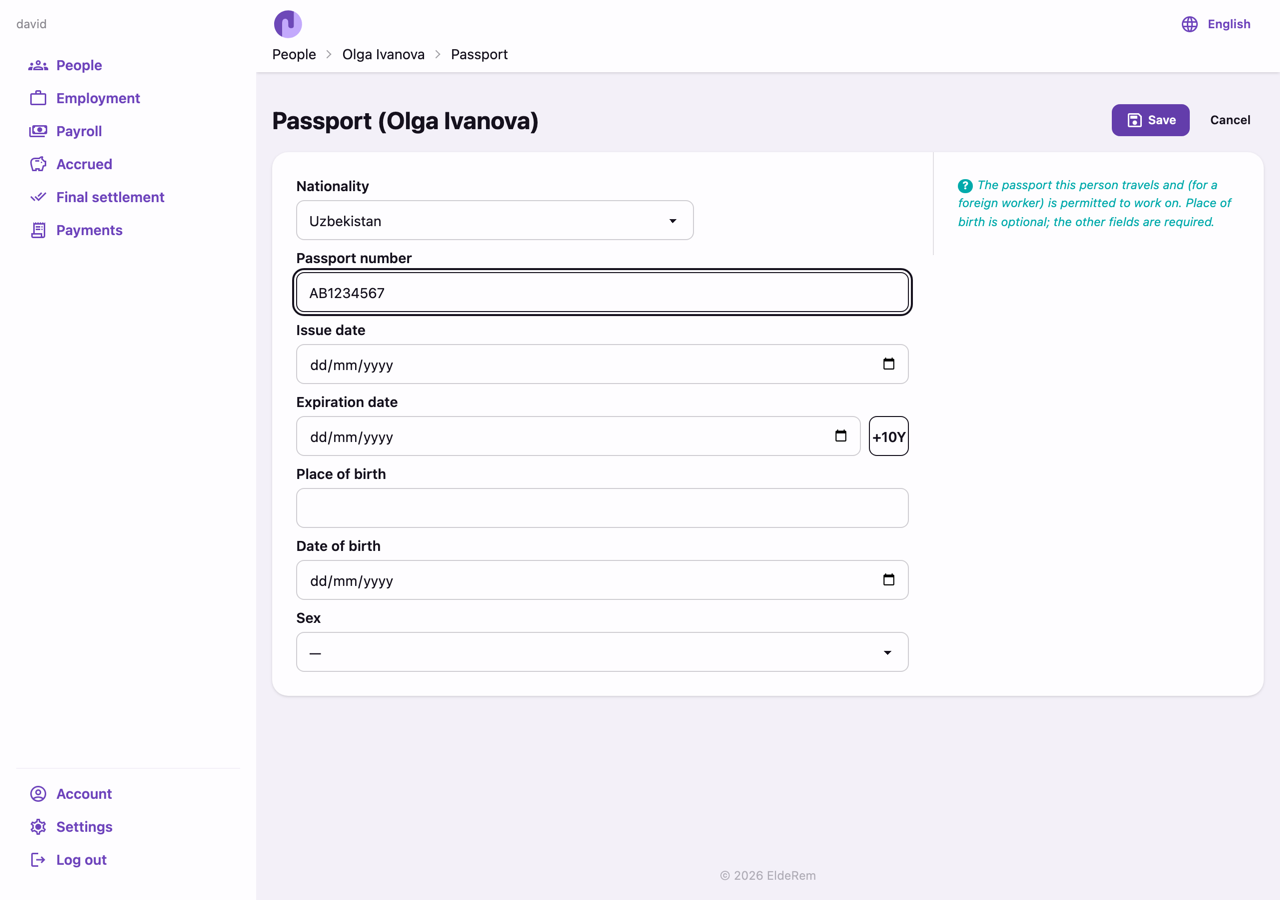
- Passport — nationality, number, issue and expiry dates, place and date of birth, sex. A person can have several over time; a +10Y button sets expiry ten years after issue.
- ID Card (citizens) — the Israeli teudat zehut.
- Visa — category and dates; +1Y / +2Y buttons set expiry from the start.
- Bank account — bank, branch and account number (where wages are paid).
Each saved document is a collapsible card with Edit (and Delete for passports/visas). A document missing a field shows an “update needed” badge.
Holidays (workers)
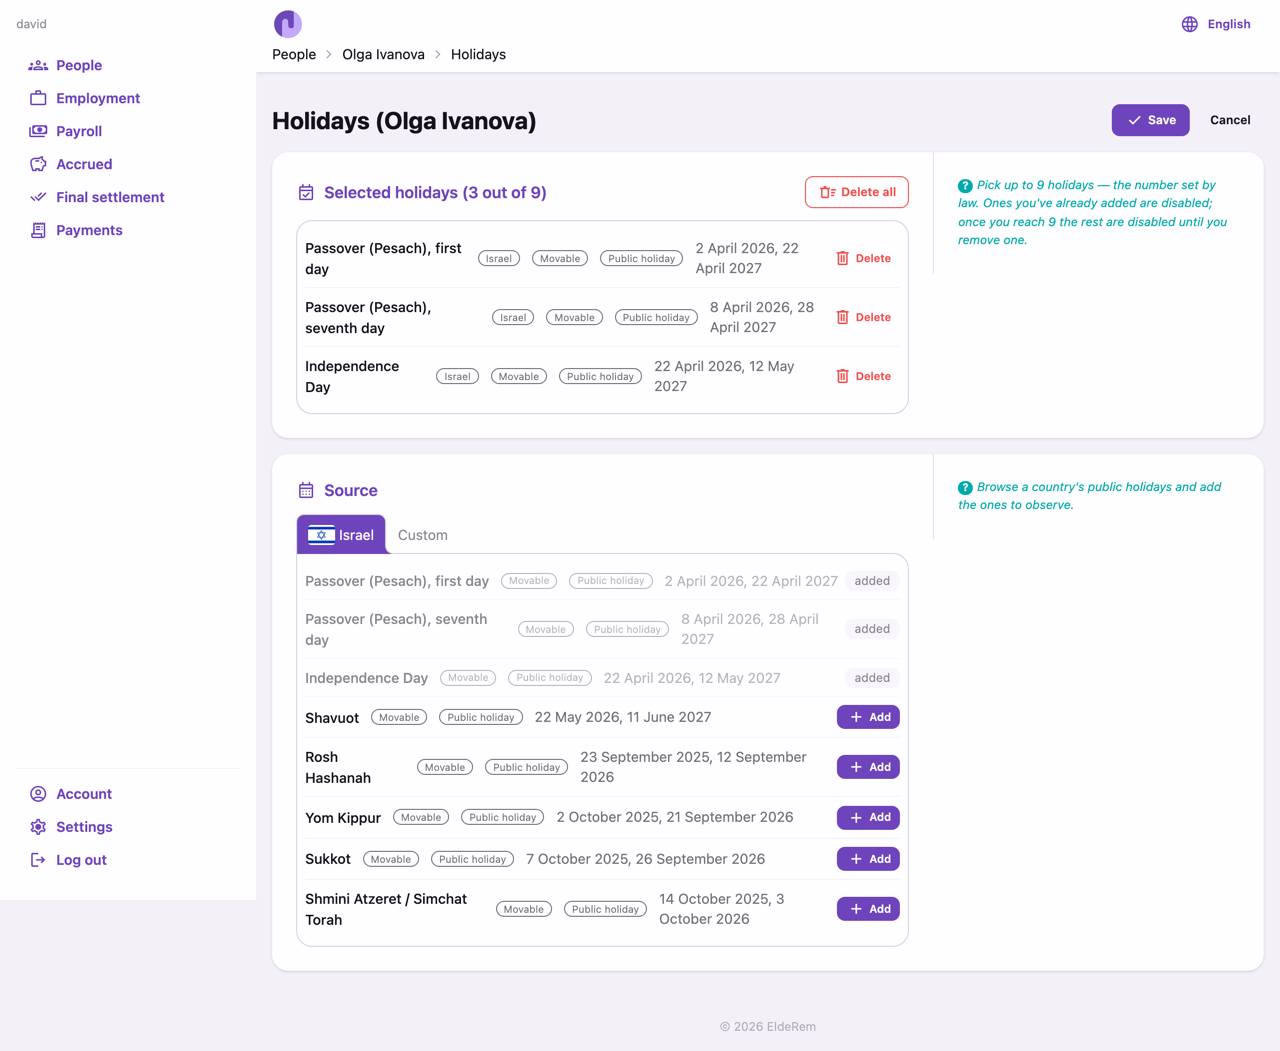
A worker’s page has a Holidays card. The picker lets you add days from Israel’s calendar and from the worker’s nationality calendar (set nationality first), or a custom day. Your selection is capped at the statutory allowance; the card shows “Holidays (N out of M)” and warns if you’re short. These feed the holiday pay on payslips.
Deleting and archiving
You can delete a contact who isn’t referenced by a draft or active employment. People captured into a finalised employment become Archived contacts — still viewable (the employment keeps its own frozen snapshot) and removable from the live list.
6. Creating an Employment

An employment connects an employer, a worker and a patient, and holds the terms and every payslip.
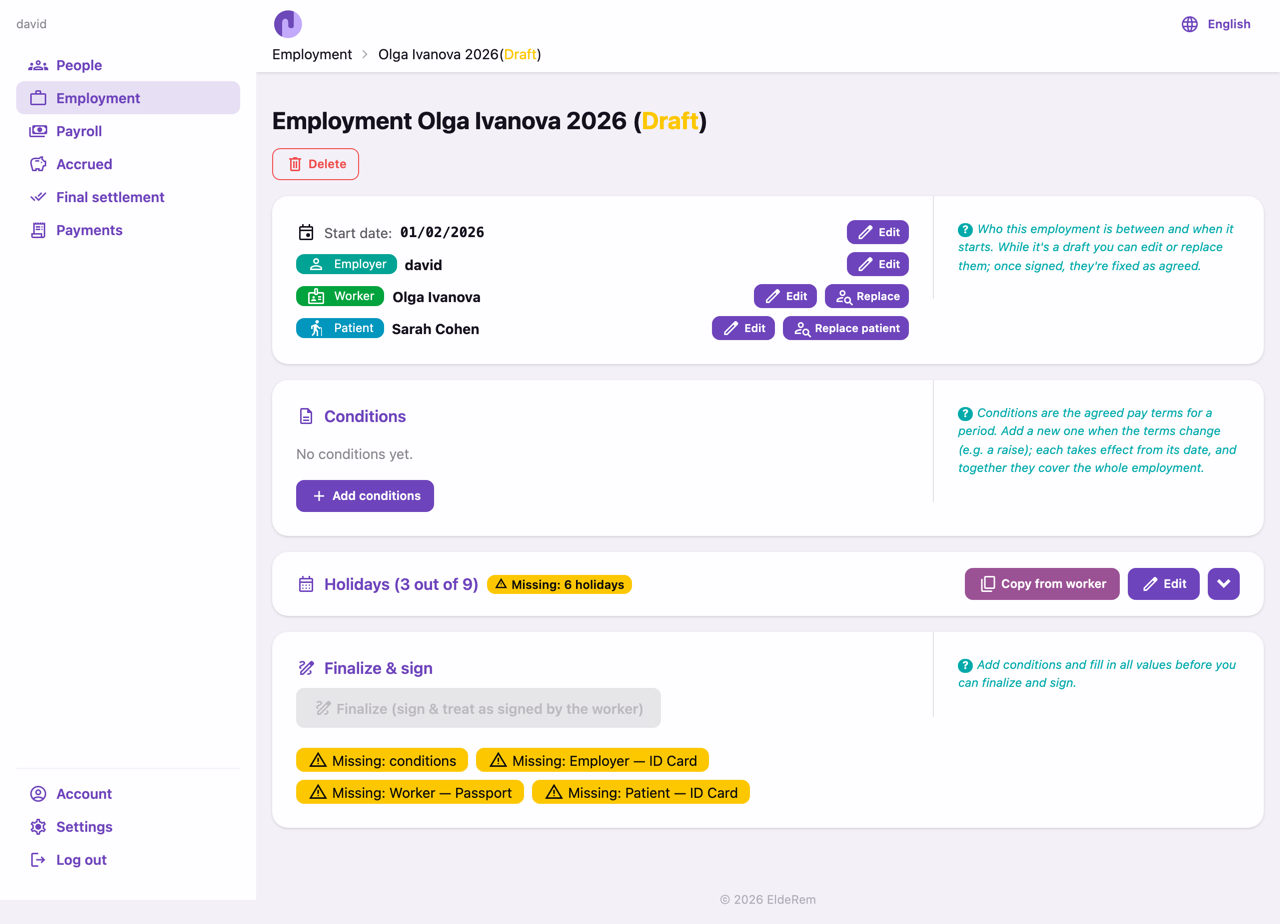
From Employment, choose New. Pick (or create inline) the worker and the patient, and set the start date (the tenure anchor). Also set the region of the patient’s home — it decides the housing‑deduction cap. The employment begins as a draft: nothing is active, nothing is owed.
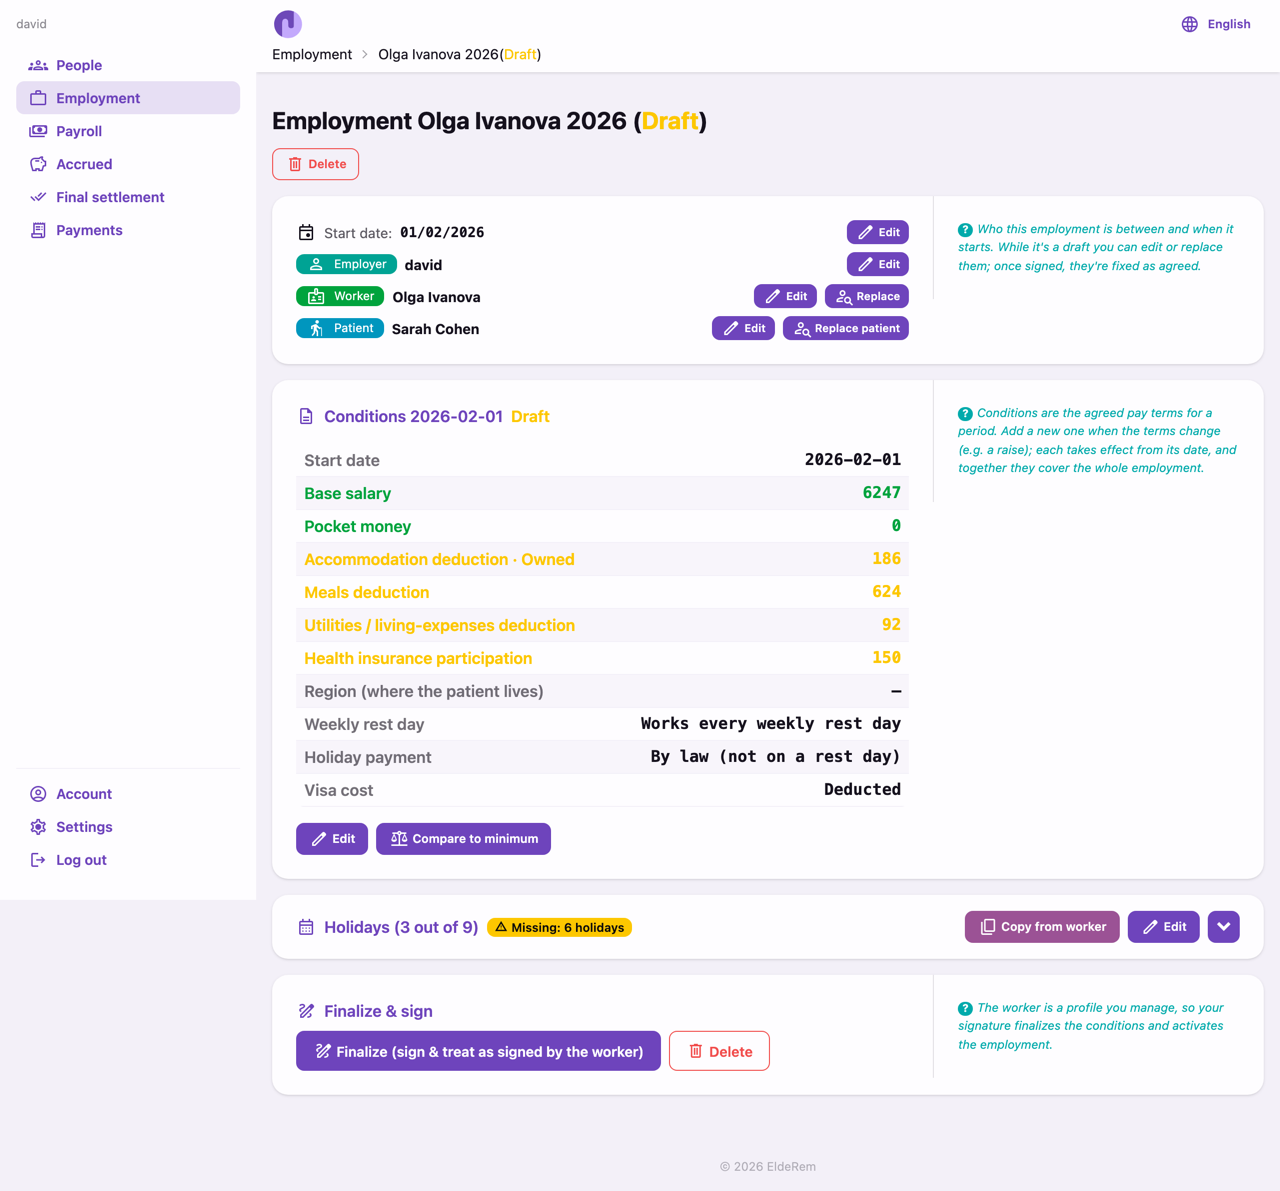
The employment page is your control centre for one employment. A row of buttons across the top changes with the employment’s state — Add conditions, Payroll, Payments, Compare to minimum, Clone, Export, and Terminate (active) or Final settlement (terminated). Below are cards for the parties, the conditions, and — after termination — postponed adjustments.

7. The Conditions — Setting the Terms
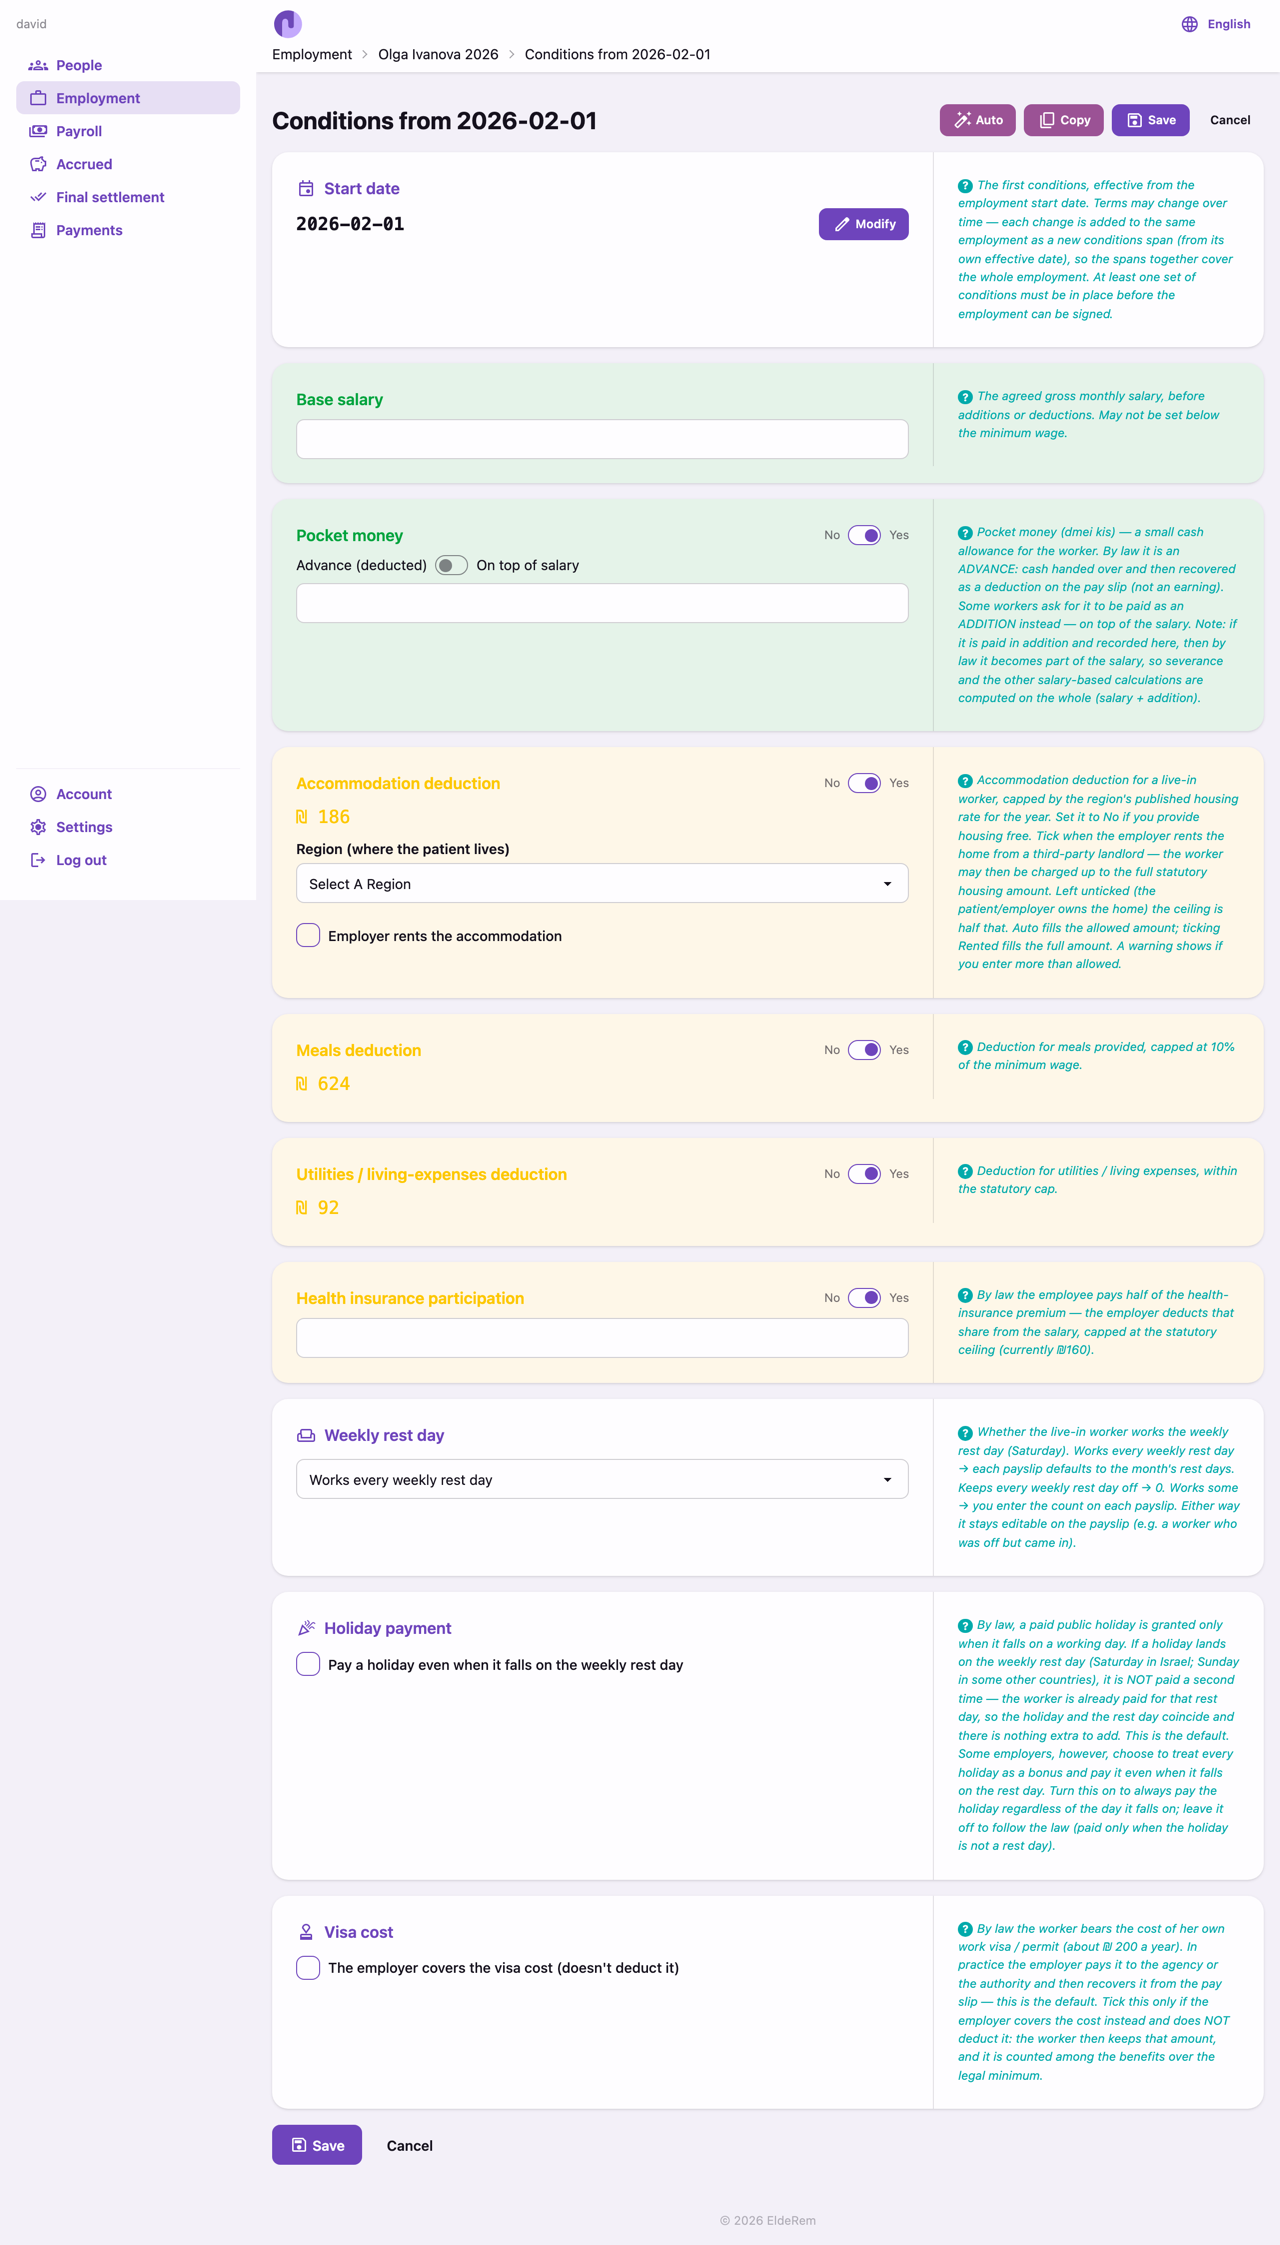
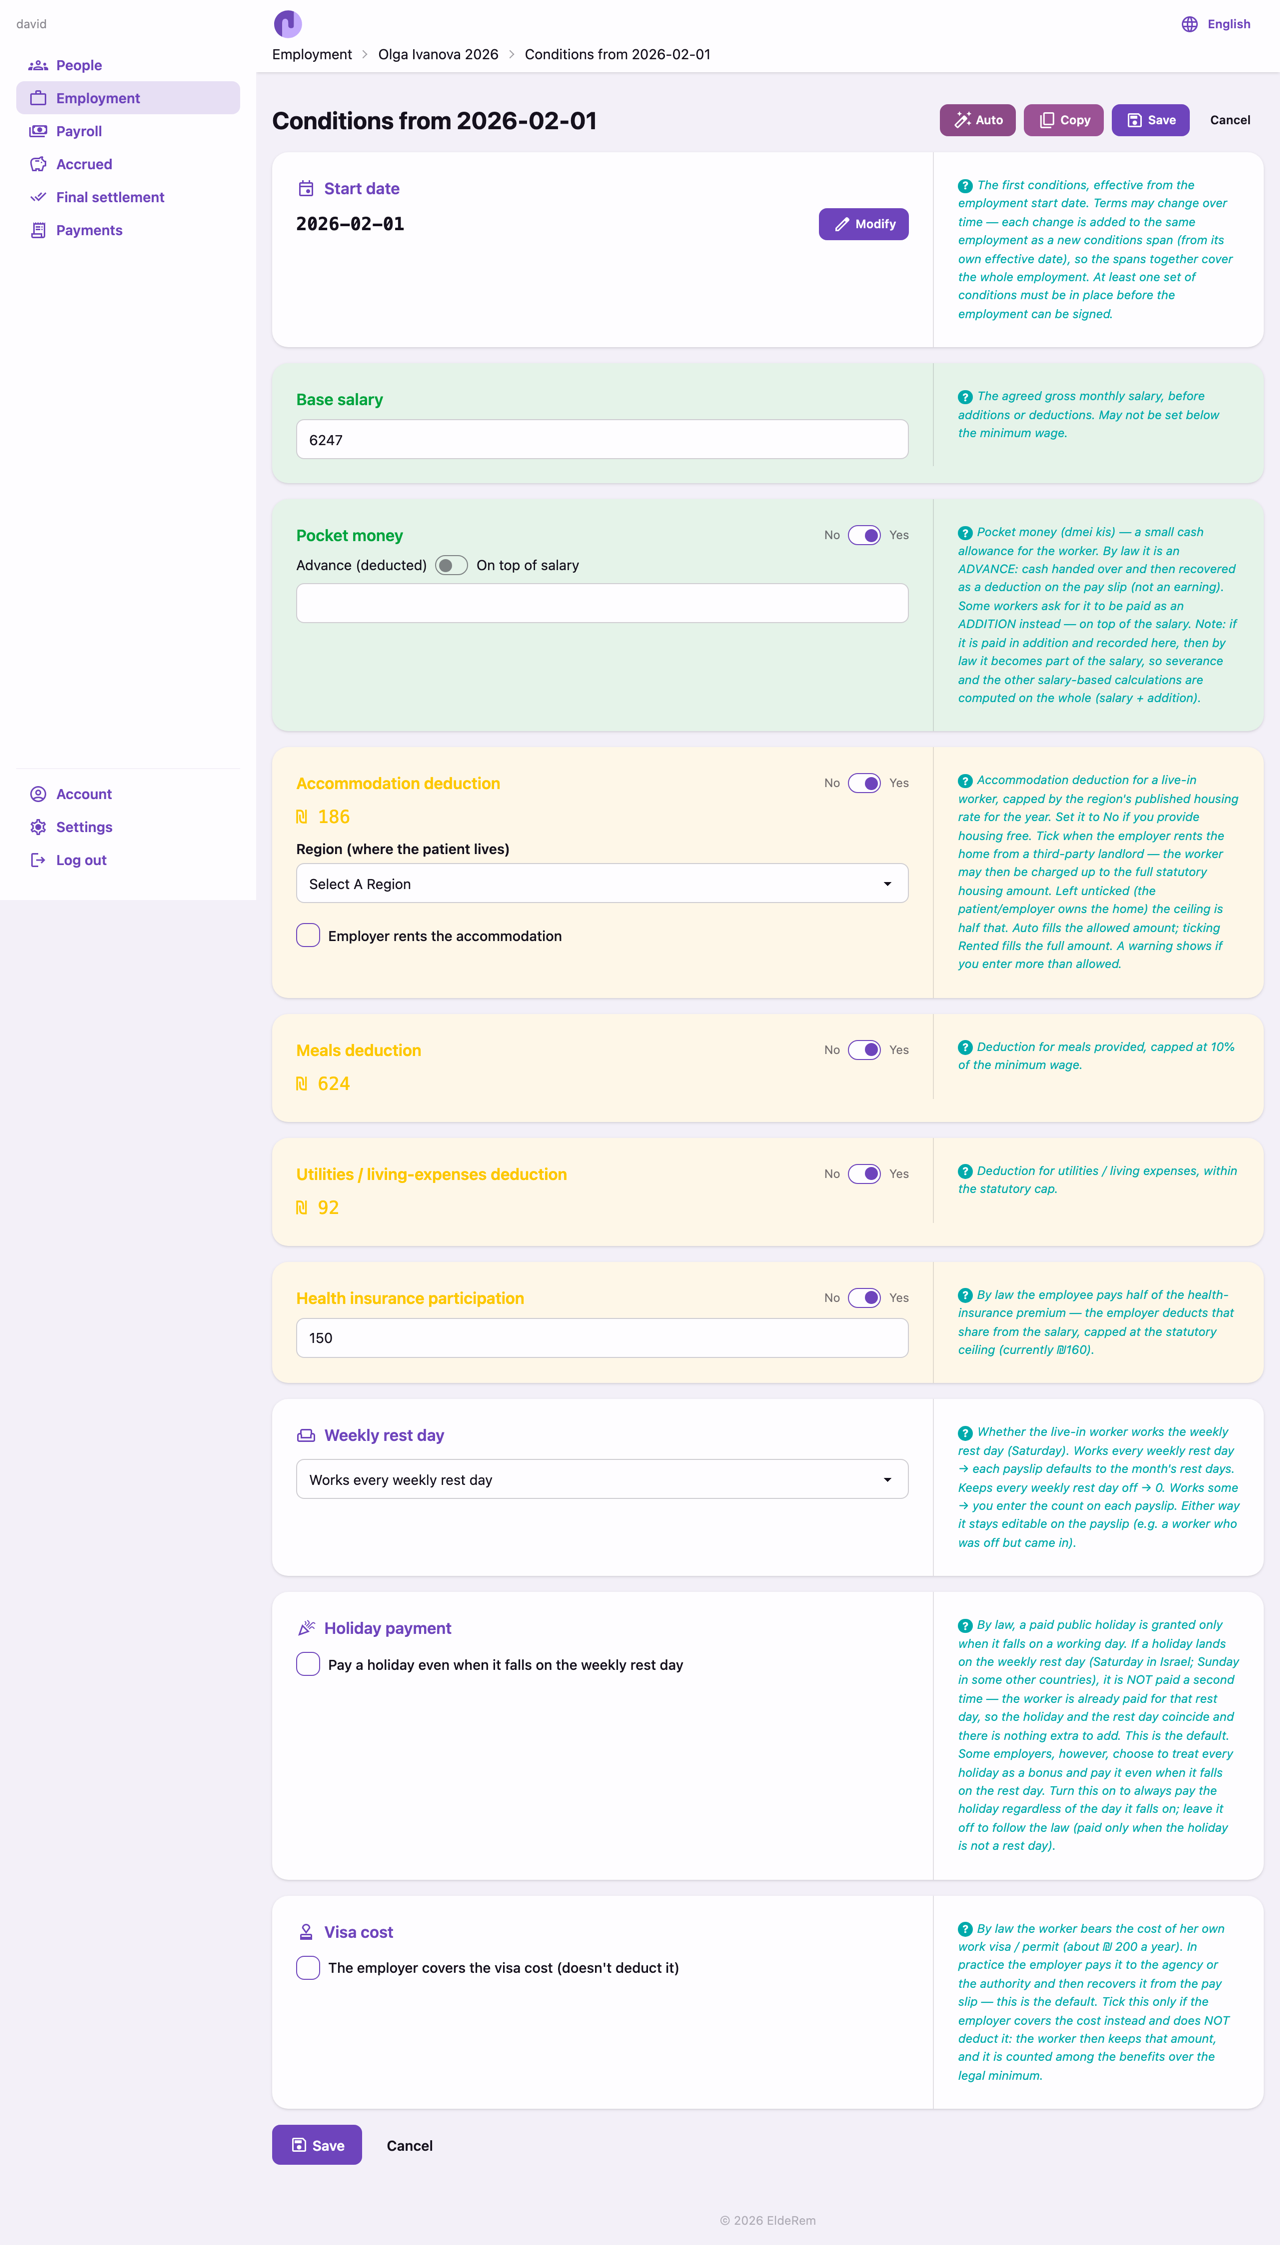
Open the Conditions card and Add conditions. This record is the agreement, and it is dated: if terms change later you add a new span with a later effective date rather than editing the old one, so history and past payslips stay correct.
The editor has one card per item:
- Effective date — when this set of terms starts (the first span starts on the employment’s start date).
- Base salary — the monthly wage; may not be below the minimum wage for the date. EldeRem also floors the calculation at the minimum, so a below‑minimum figure never under‑pays.
- Pocket money (dmei kis) — an advance (deducted from the slip, the default) or an addition (paid on top of salary).
- Deductions, each with a Yes/No switch and a statutory cap: accommodation, meals, utilities / living expenses, health insurance (the worker’s share), and the visa cost.
The header Auto button fills the whole draft from the statutory defaults for the effective date, which you then adjust.
The accommodation deduction (housing)
Because the worker lives in the home, housing is special. Tell the app who owns the home with the “Employer rents the accommodation” checkbox:
- Ticked (rented) — the employer rents from a third‑party landlord → the worker may be charged up to the full statutory housing amount.
- Unticked (owned) — the patient/employer owns the home (the usual live‑in case) → the ceiling is half that.
The region (and year) determine the figure. If the app has no published figure for a year, type the region name and your own amount. Typing more than allowed raises a warning but does not block saving — EldeRem flags compliance, it doesn’t force the number.
Compare to minimum
The Compare to minimum button (on the employment page) shows, item by item, how your agreed terms sit against the legal minimum — a quick fairness and compliance check.
8. Signing and Activating
Terms take effect once both sides agree:
- The employer signs (the Finalize & sign control).
- If the worker is a real user with their own login, they must counter‑sign. If the worker is a profile you manage (or a simulation), the employer’s signature stands for both.
When fully signed, the app activates the employment — but only if the required identity documents are on file: the worker needs a passport (or ID card) with a number; the employer and patient need their ID card. If something is missing, activation is blocked and the missing items are listed under the disabled button. (Simulation mode bypasses this gate.)
On activation, EldeRem freezes a snapshot of every party’s name, documents, address and contact details — the compliance record for that contract, viewable later from the employment’s party‑snapshot page even after details change.
To change pay or deductions on an active employment, add a new Conditions span with a later effective date (or clone the current one and edit it). You never edit a finalised span. If you must fix an error in unpaid terms, you can revert the latest span to a draft.

9. Understanding the Money (Every Line Explained)
A payslip has three groups of lines.
A. Paid to the worker this month
- Base salary — the monthly wage (at least the minimum).
- Rest‑day pay — a premium (about 1.5×) for work on the weekly rest day (Saturday), for the rest days actually worked.
- Holiday pay — for public holidays the worker’s nationality observes that fall in the month.
- Additional items — one‑off lines you add to this single payslip (a bonus, or an absorbed visa cost). Positive is paid to the worker; negative is deducted.
Together these make the gross pay — the base on which national insurance is charged.
B. Deducted from the worker
Each applies only if switched on in the Conditions, and each is capped: accommodation (by region and ownership), meals (a small percentage of the minimum wage), utilities, health insurance (up to half the premium), and visa cost (the annual permit, spread out). Pocket money may also net against pay, depending on the arrangement.
C. The employer’s obligations (not cash to the worker)
- National insurance (Bituach Leumi) — a percentage of gross pay, remitted to the authority (monthly or quarterly).
- Pension — a monthly employer contribution into a fund.
- Severance, annual leave, recuperation — set aside each month, paid later.
The net pay is what actually reaches the worker. Every line shows its basis — the arithmetic behind it — so nothing is a black box.
10. Running Payroll — The Monthly Payslip
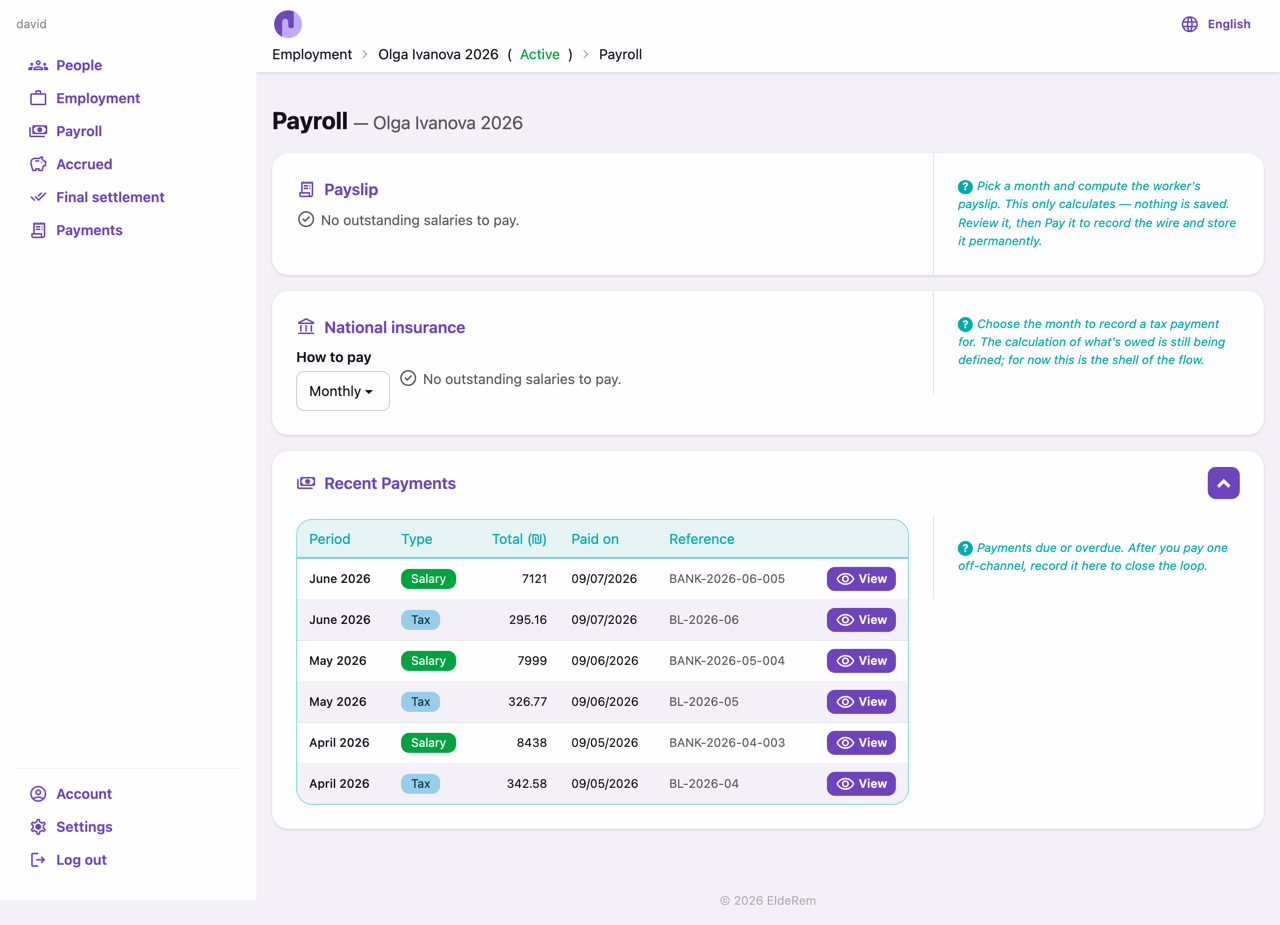
Open Payroll and, if you have several employments, pick one. The payroll page shows Warnings (unpaid months, or an unpaid final settlement), a Prepare payslip chooser, a National insurance card, and Recent payslips.
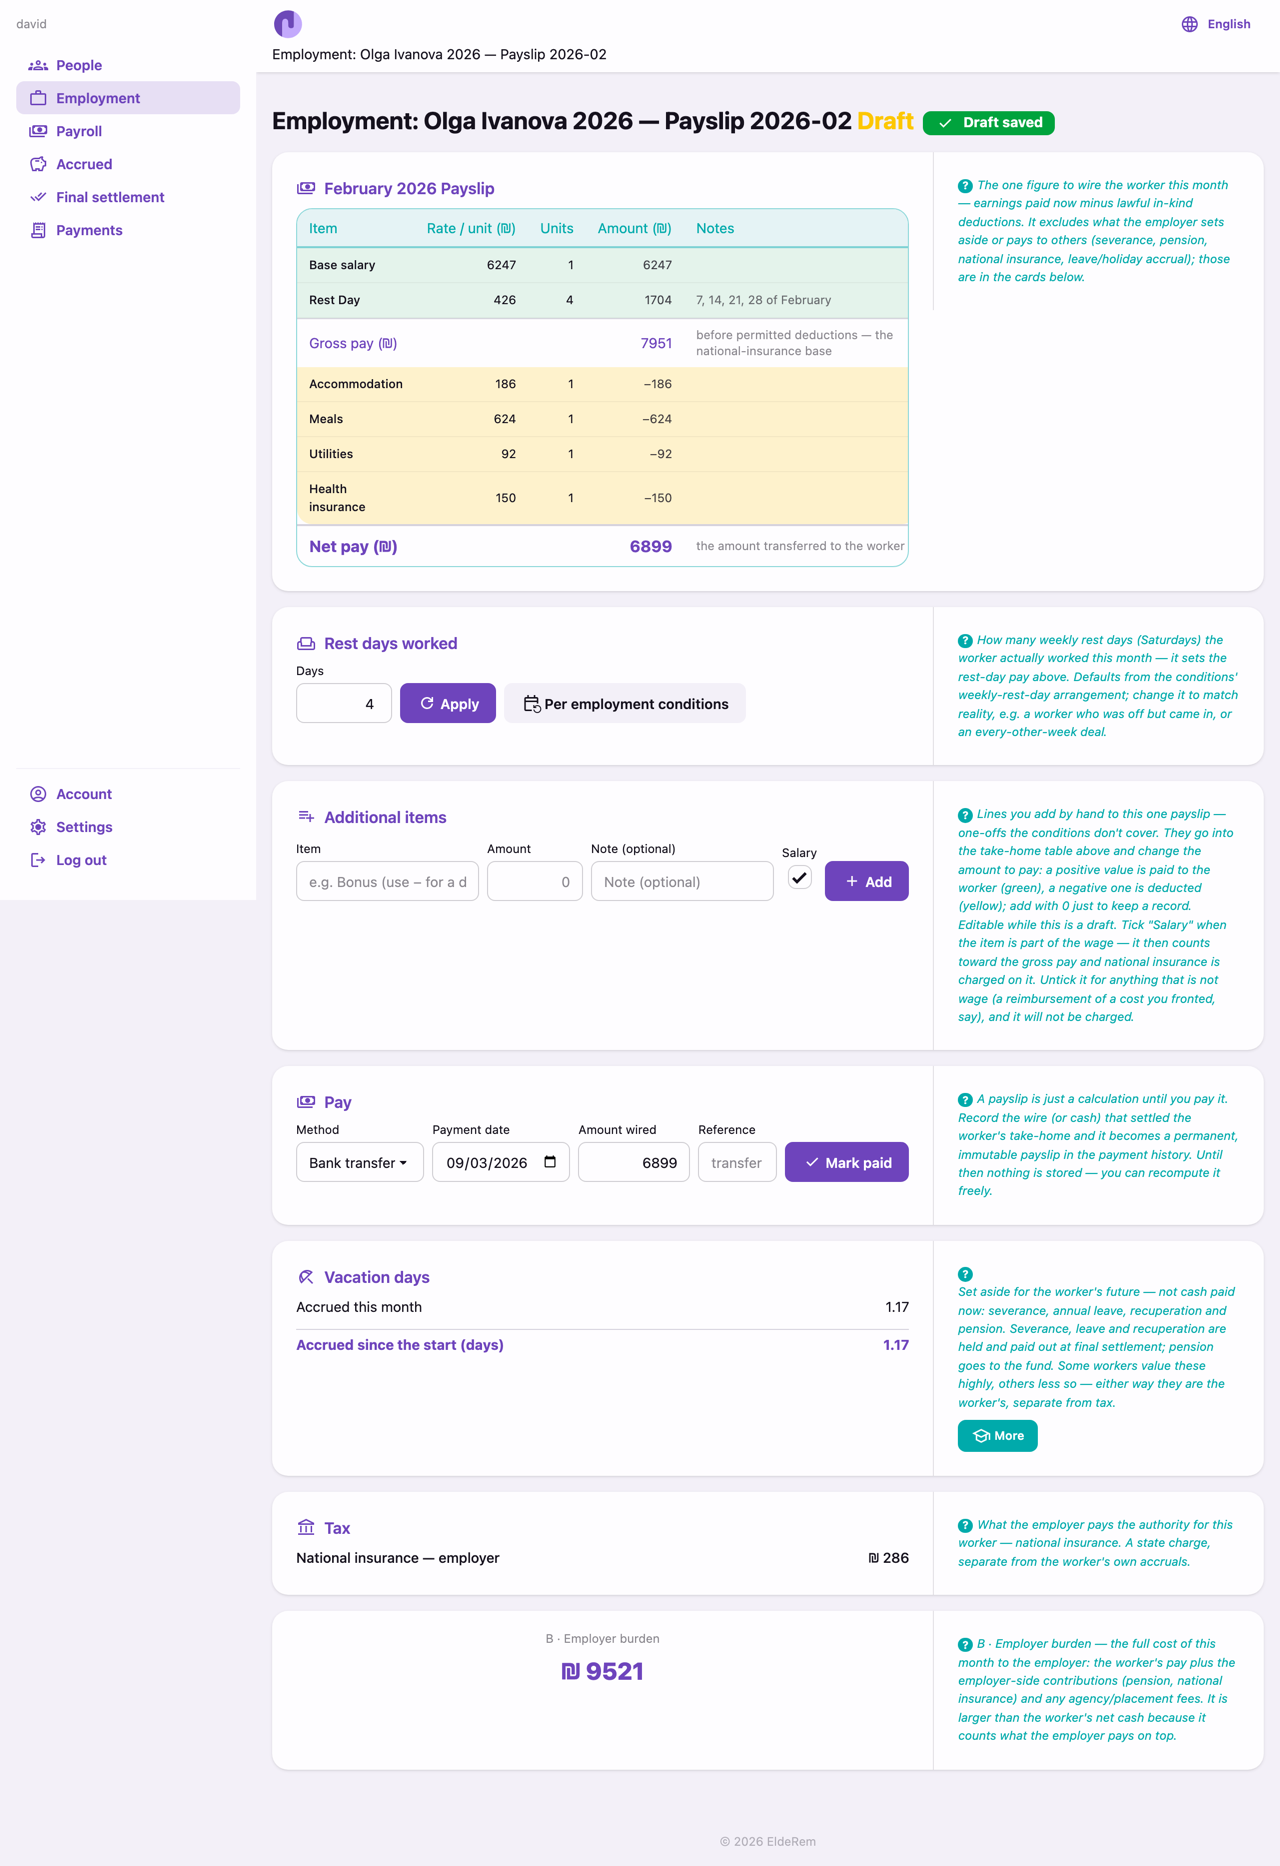
Opening a month gives you a draft — a full calculation you can adjust before paying:
- Rest days worked — defaults from the Conditions; edit it if reality differed.
- Additional items — add one‑off lines (label, amount, a note, and whether the line counts toward gross pay). Add or remove them freely while it is a draft.
As you change these, the take‑home figure and the derived cards (accrued days, tax, employer burden) update. Nothing is recorded until you pay — the draft is a safe place to get the month right. While it is a draft, EldeRem also shows the accrued days to date, the tax implied, and the employer burden (the total cost of the worker); a paid slip stores only the payment itself.
11. Recording the Payment
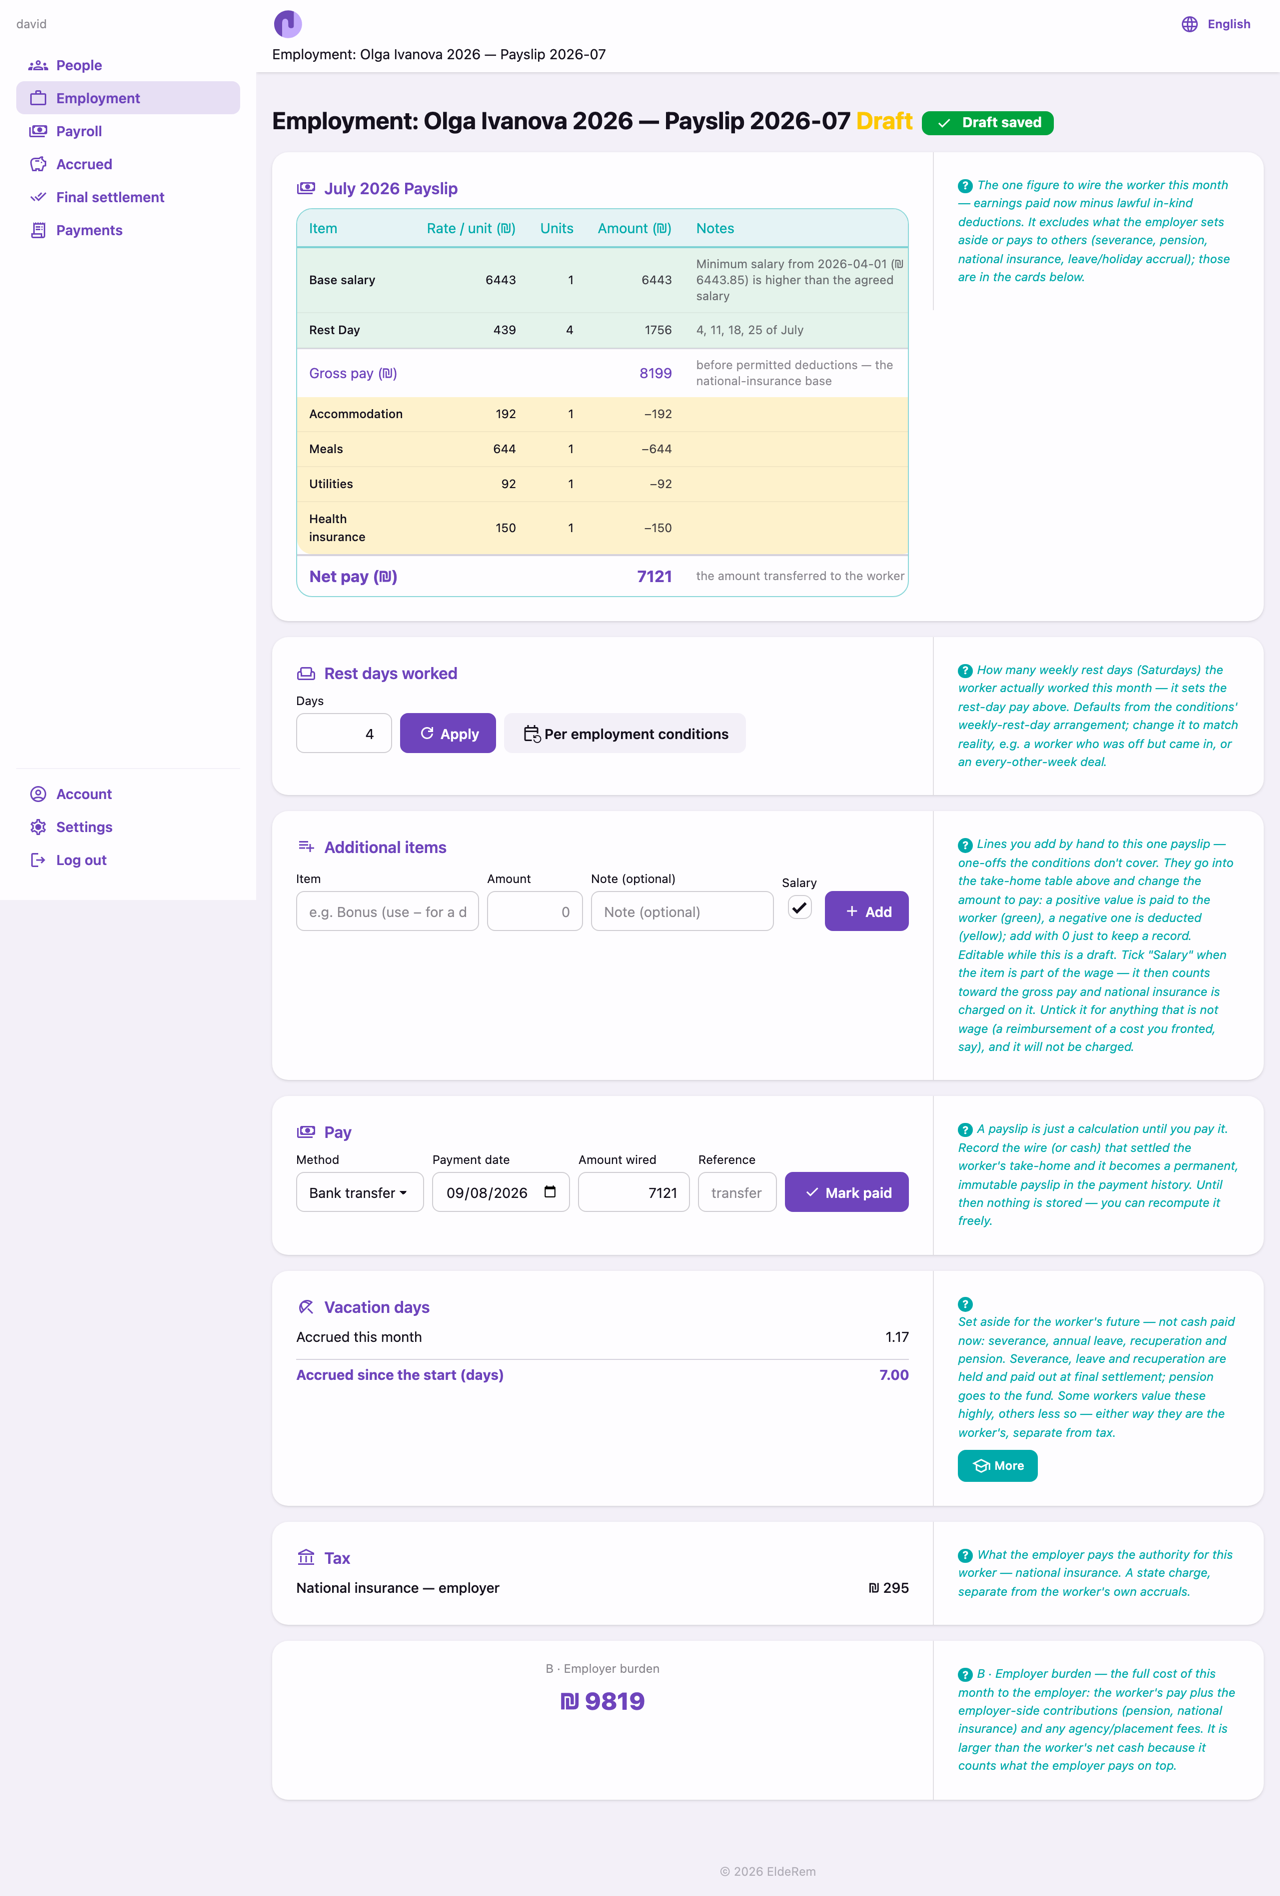
When the draft is right, use the Pay card at the bottom. Record the wire: method (bank transfer, cash, other), payment date, amount (pre‑filled with the net pay — change it if you paid differently), and an optional reference. Press Pay.
This makes the payslip immutable (a permanent record for that month) and records your payment confirmation. You return to the payroll page, where the slip appears under Recent payslips and that month’s warning clears.
A paid payslip cannot be edited — that is the point of it. Get the draft right before paying.

12. National Insurance (Bituach Leumi) Payments
The employer owes national insurance to the authority — paid to Bituach Leumi, monthly or quarterly (your choice, in Settings). From the payroll page’s National insurance card, open the tax detail for a period. EldeRem shows the amount due and gives you a copy‑and‑paste data card with the figures for the government form, so you don’t re‑type. You record the payment as you would a wage (date, method, reference). The payer details are set once on your account and reused.


13. Accrued Benefits — Vacation, Recuperation, Severance, Pension
Some of what the worker is owed accrues rather than being paid each month. The
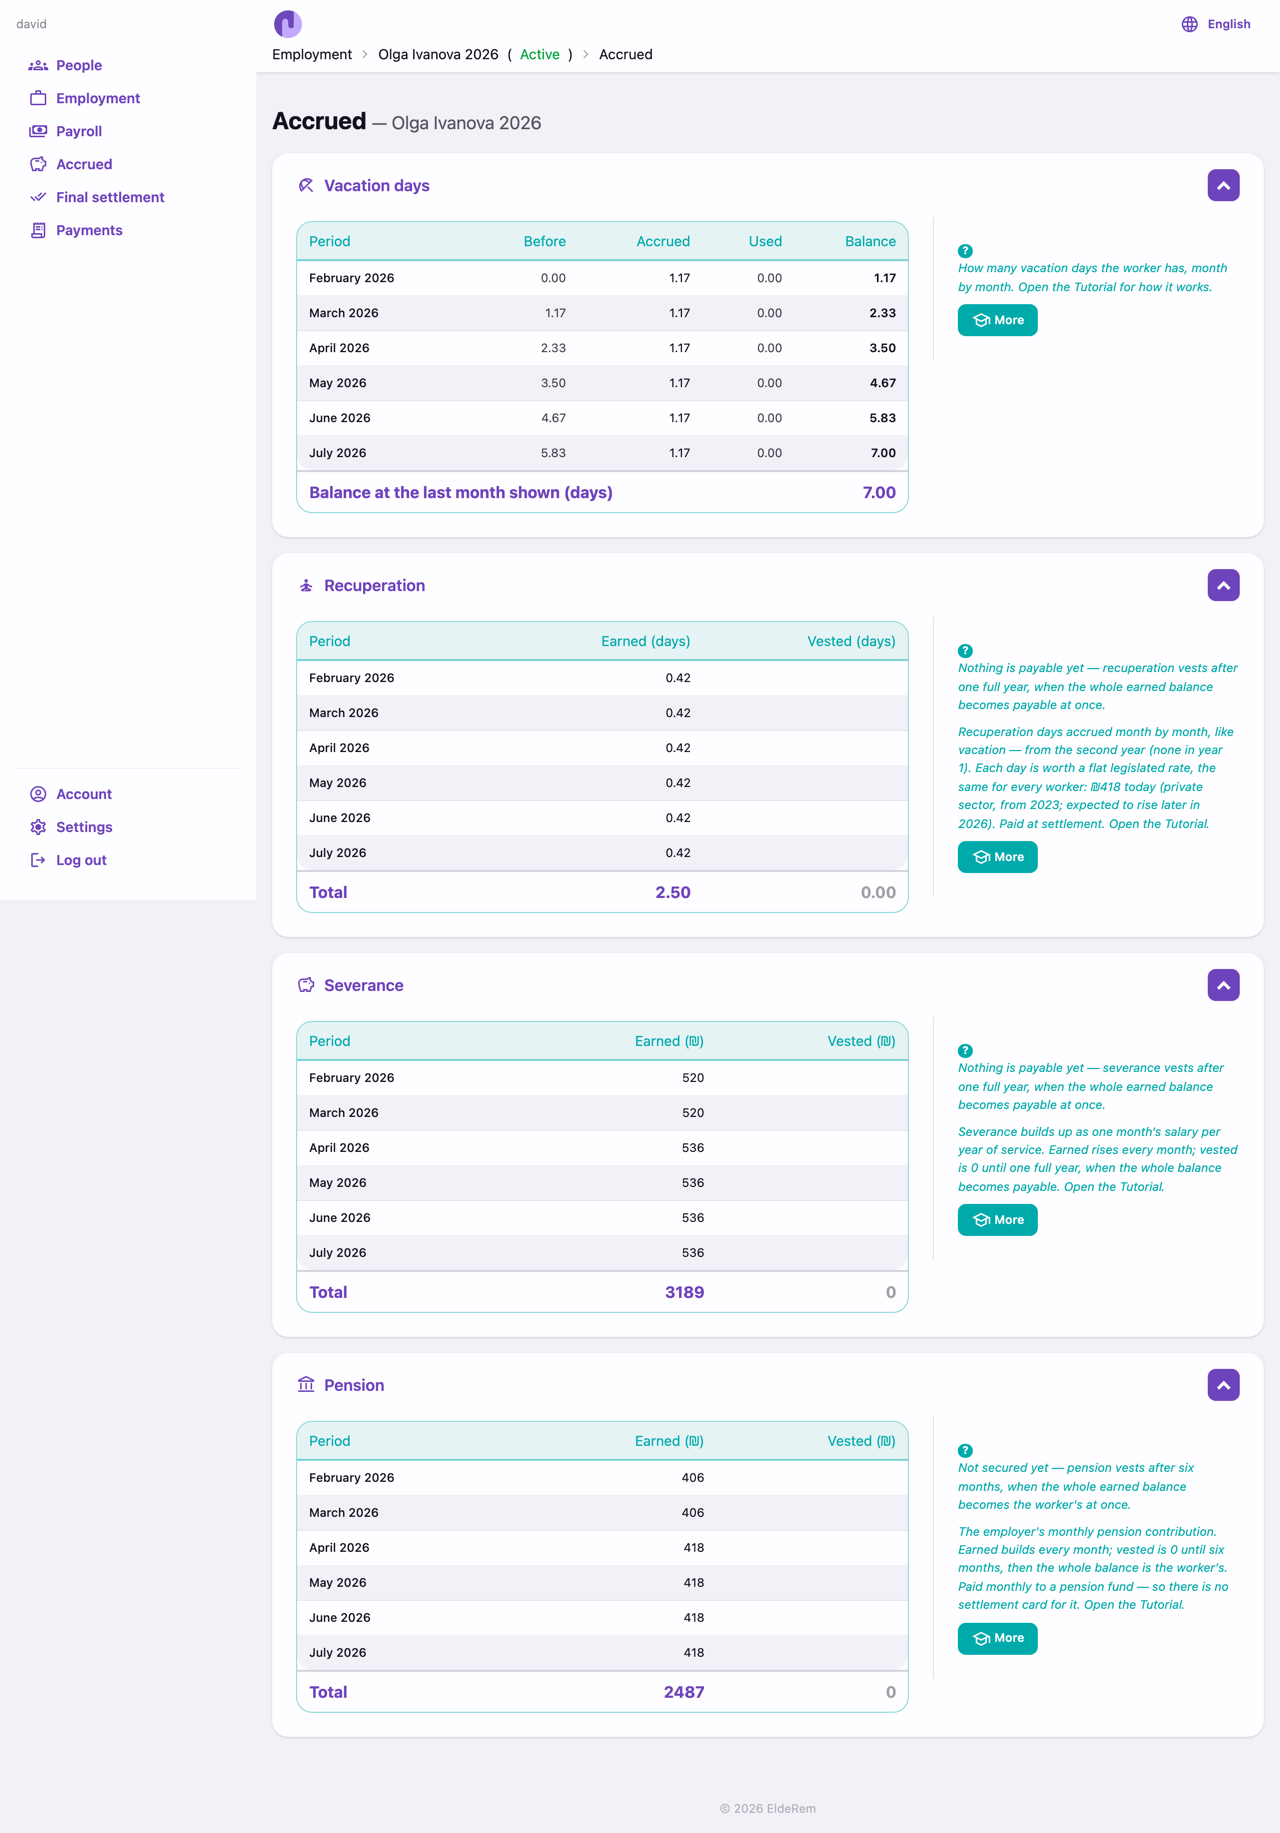
Accrued page shows one foldable card per benefit, month by month, for the selected employment.
Earned vs vested
- Earned — how much has built up. Each row shows that month’s own accrual; the Total line adds them up.
- Vested — how much the worker would actually get if the job ended now. Some benefits have a waiting period, so vested sits at 0 until a gate is crossed, then catches up. The gap between earned and vested is what is still at risk.
The four benefits
- Vacation days — accrue from the first day, rising with seniority; shown in days, unused days paid out at the end.
- Recuperation (dmei havra’a) — a number of days per year by seniority, each worth a flat, legislated rate (not the daily wage). Vests after one completed year — nothing in year one, then the whole first year is credited at once.
- Severance (pitzuei piturin) — roughly one month’s salary per year of service, pro‑rated. Also vests after one year.
- Pension — a monthly employer contribution with a six‑month qualifying period. Unlike the others it is paid into a fund every month, so there is nothing to settle at the end (no settlement card for it).
Each card carries a Tutorial button that opens the full explanation, and a note (in the card’s help) when a balance has not yet vested.
14. Ending an Employment — Termination and Final Settlement
Terminate
On the employment page, use Terminate and set the end date. The employment becomes terminated — you can still produce payslips for the months it covered, and now you can settle it.
The Final settlement page
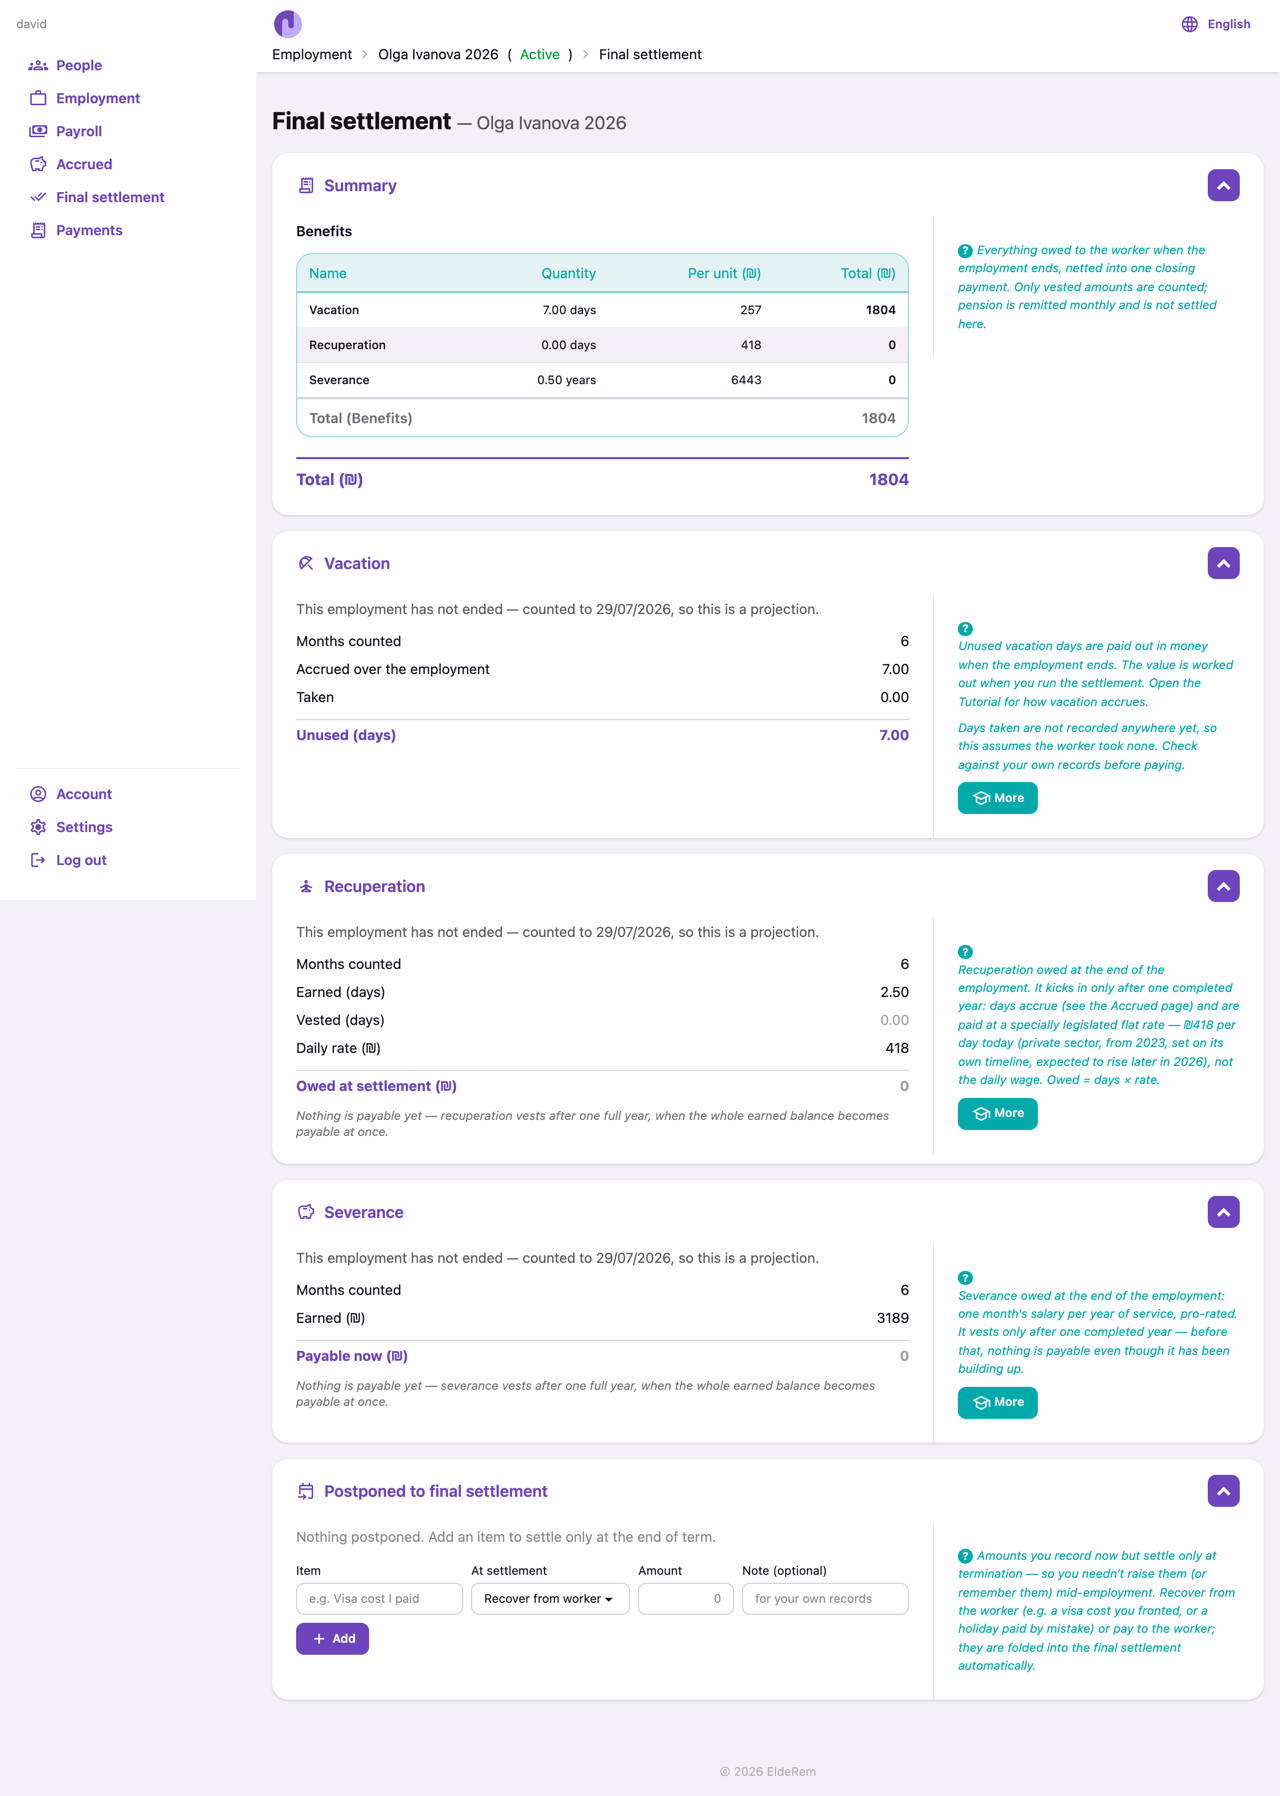
Open Final settlement (from the employment page or the sidebar). This page reviews what is owed at the close — you can look before you commit, and even on an employment that has not ended (then it is a projection). It is a stack of foldable cards:
- Summary — the headline, in two tables:
- Benefits — each benefit as quantity × per‑unit = total (unused vacation days × the daily wage; recuperation days × the flat rate; severance as years × monthly salary), with a Total (Benefits).
- Postponed adjustments — the deferred corrections, each with its note, and a Total (Adjustments).
- Then one line: Total — benefits plus adjustments — the figure to pay.
- Vacation, Recuperation, Severance — a card each, showing the days or money owed and how it was reached.
- Postponed to final settlement — add or remove deferred adjustments here.
Pension does not appear — it was paid into the fund monthly.
Postponed adjustments
Throughout the employment you can record a correction and defer it to the final settlement — a visa cost the employer fronted (recovered from the worker), or a mistaken payment. A positive amount is paid to the worker; a negative one is recovered. You add these with the same card in two places:
- On the employment page, the button says Postpone (deferring to the end).
- On the final‑settlement page, the button says Add (adding straight to the settlement in front of you) — this works even after termination, which is exactly when a forgotten correction surfaces.
Each adjustment carries a note explaining what it was for, shown in the summary.
Paying the settlement
The settlement uses the same Pay card as a monthly payslip: method, date, amount (pre‑filled with the Summary total), reference. Paying it creates an immutable settlement payslip, records the wire, and marks the deferred adjustments as settled. Afterwards the page shows a Paid card with the recorded payment details and a link to the settlement payslip, and the adjustments stay visible as part of what was paid.
There is one final settlement per employment — it cannot be run twice. The paid amount you record is the authoritative figure; the Summary total above it is the app’s derived estimate, so the two can differ.
15. Payments History
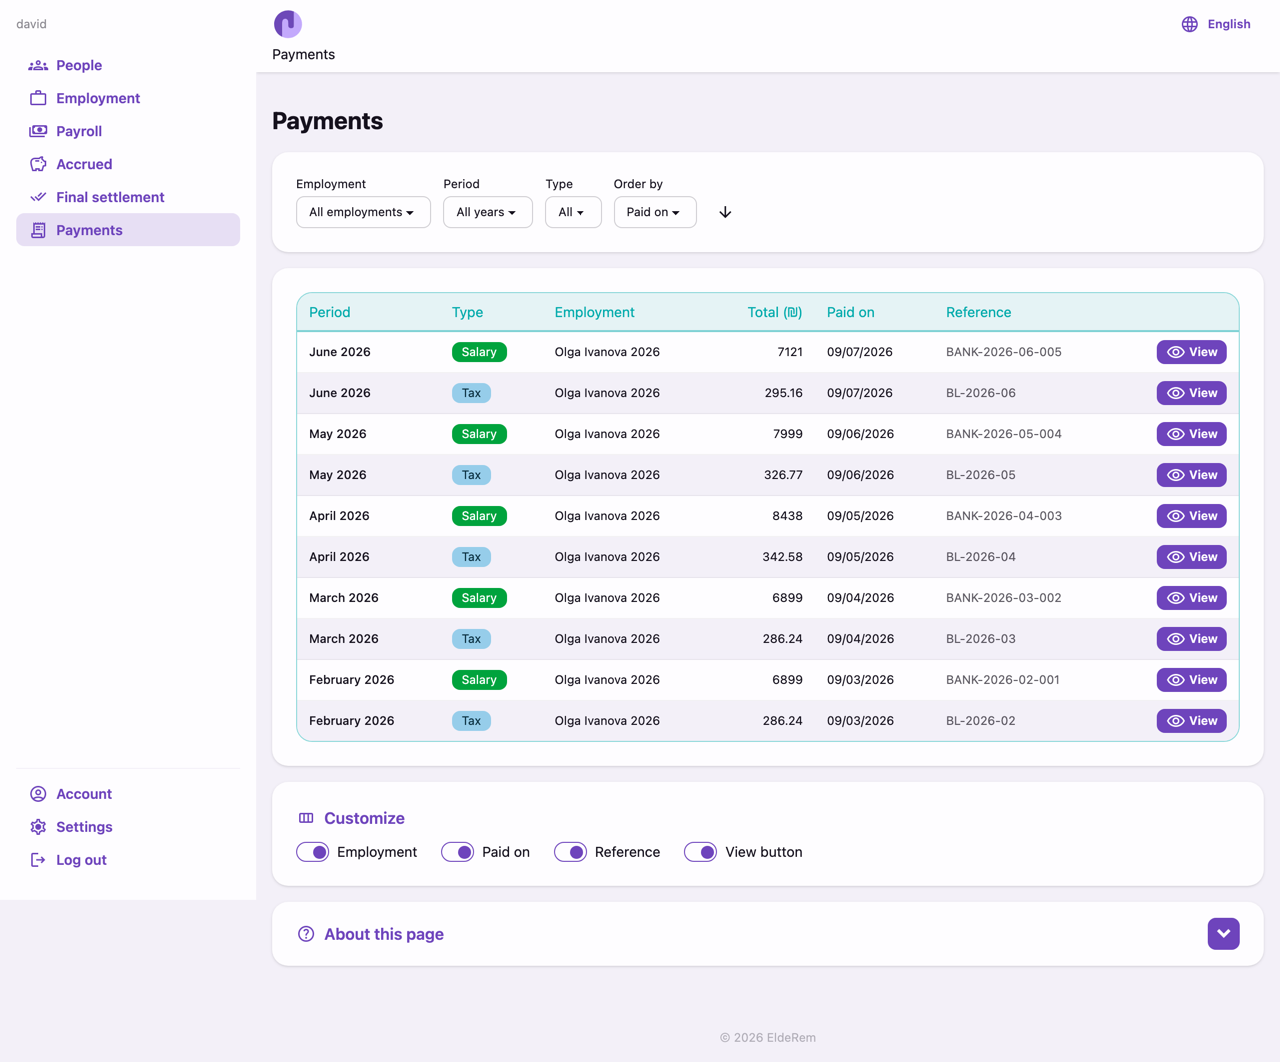
Payments is the ledger of everything you have recorded — monthly wages, national‑insurance payments, and the final settlement. Filter by employment. Each entry shows the period, the amount, and the recorded wire (date, method, reference), and links back to the immutable record behind it. This is your audit trail.

16. Inbox
The Inbox collects the messages and reminders the app generates — for example, an upcoming or overdue payment. The sidebar shows an unread count; open a message to read it.
17. Settings
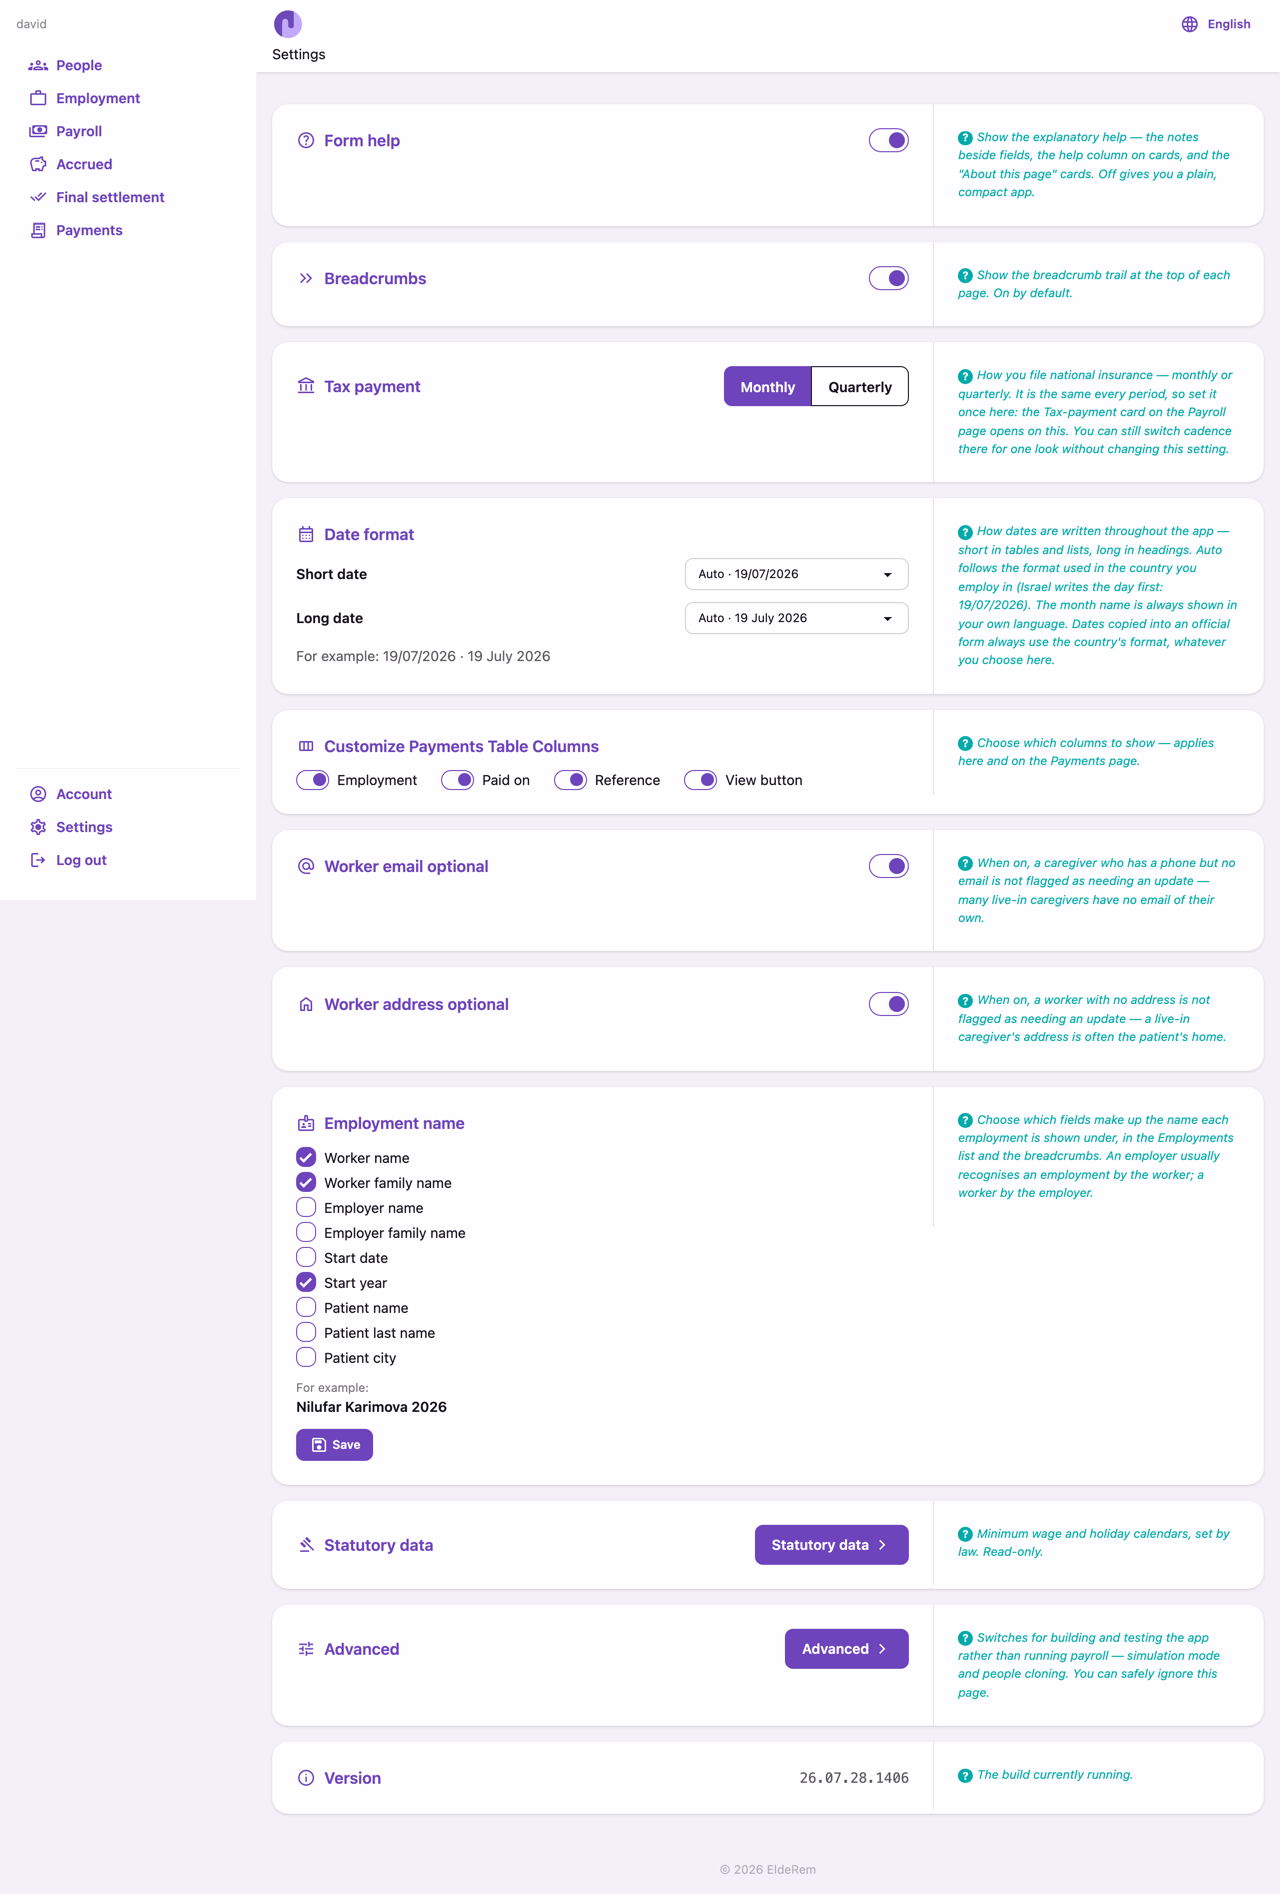
Open Settings. The everyday preferences are on the main page; the powerful, occasional tools are under Advanced.
Everyday settings
- Language — switch the whole app (Hebrew, Russian, English, Uzbek); pick the one your worker reads.
- Date format — short or long dates for the interface, with a worked example (19 July 2026). Anything printed for an official form always uses the jurisdiction’s own format, regardless of this preference, because the authority reads it, not you.
- Employment name — choose how employments are labelled in lists and pickers (by worker, patient, or a combination), with a live preview.
- Help text — turn the inline ”?” help on or off everywhere.
- Breadcrumbs, payment columns, tax cadence (monthly or quarterly), and worker email/address optional (both default on — many live‑in caregivers have no email of their own and share the patient’s address) tune the app to how you work.
System settings
The System page shows the statutory reference data the app calculates with — the rate sets, the recuperation scale and daily rate, the housing caps, and the holiday calendars. It is read‑only: you can see exactly which legal numbers a calculation used, but you cannot change them here (they come from the law).
Advanced settings
- Simulation mode — practise with fake data (Chapter 19).
- Clone people — duplicate a person, useful for test or similar records.
18. The Tutorial
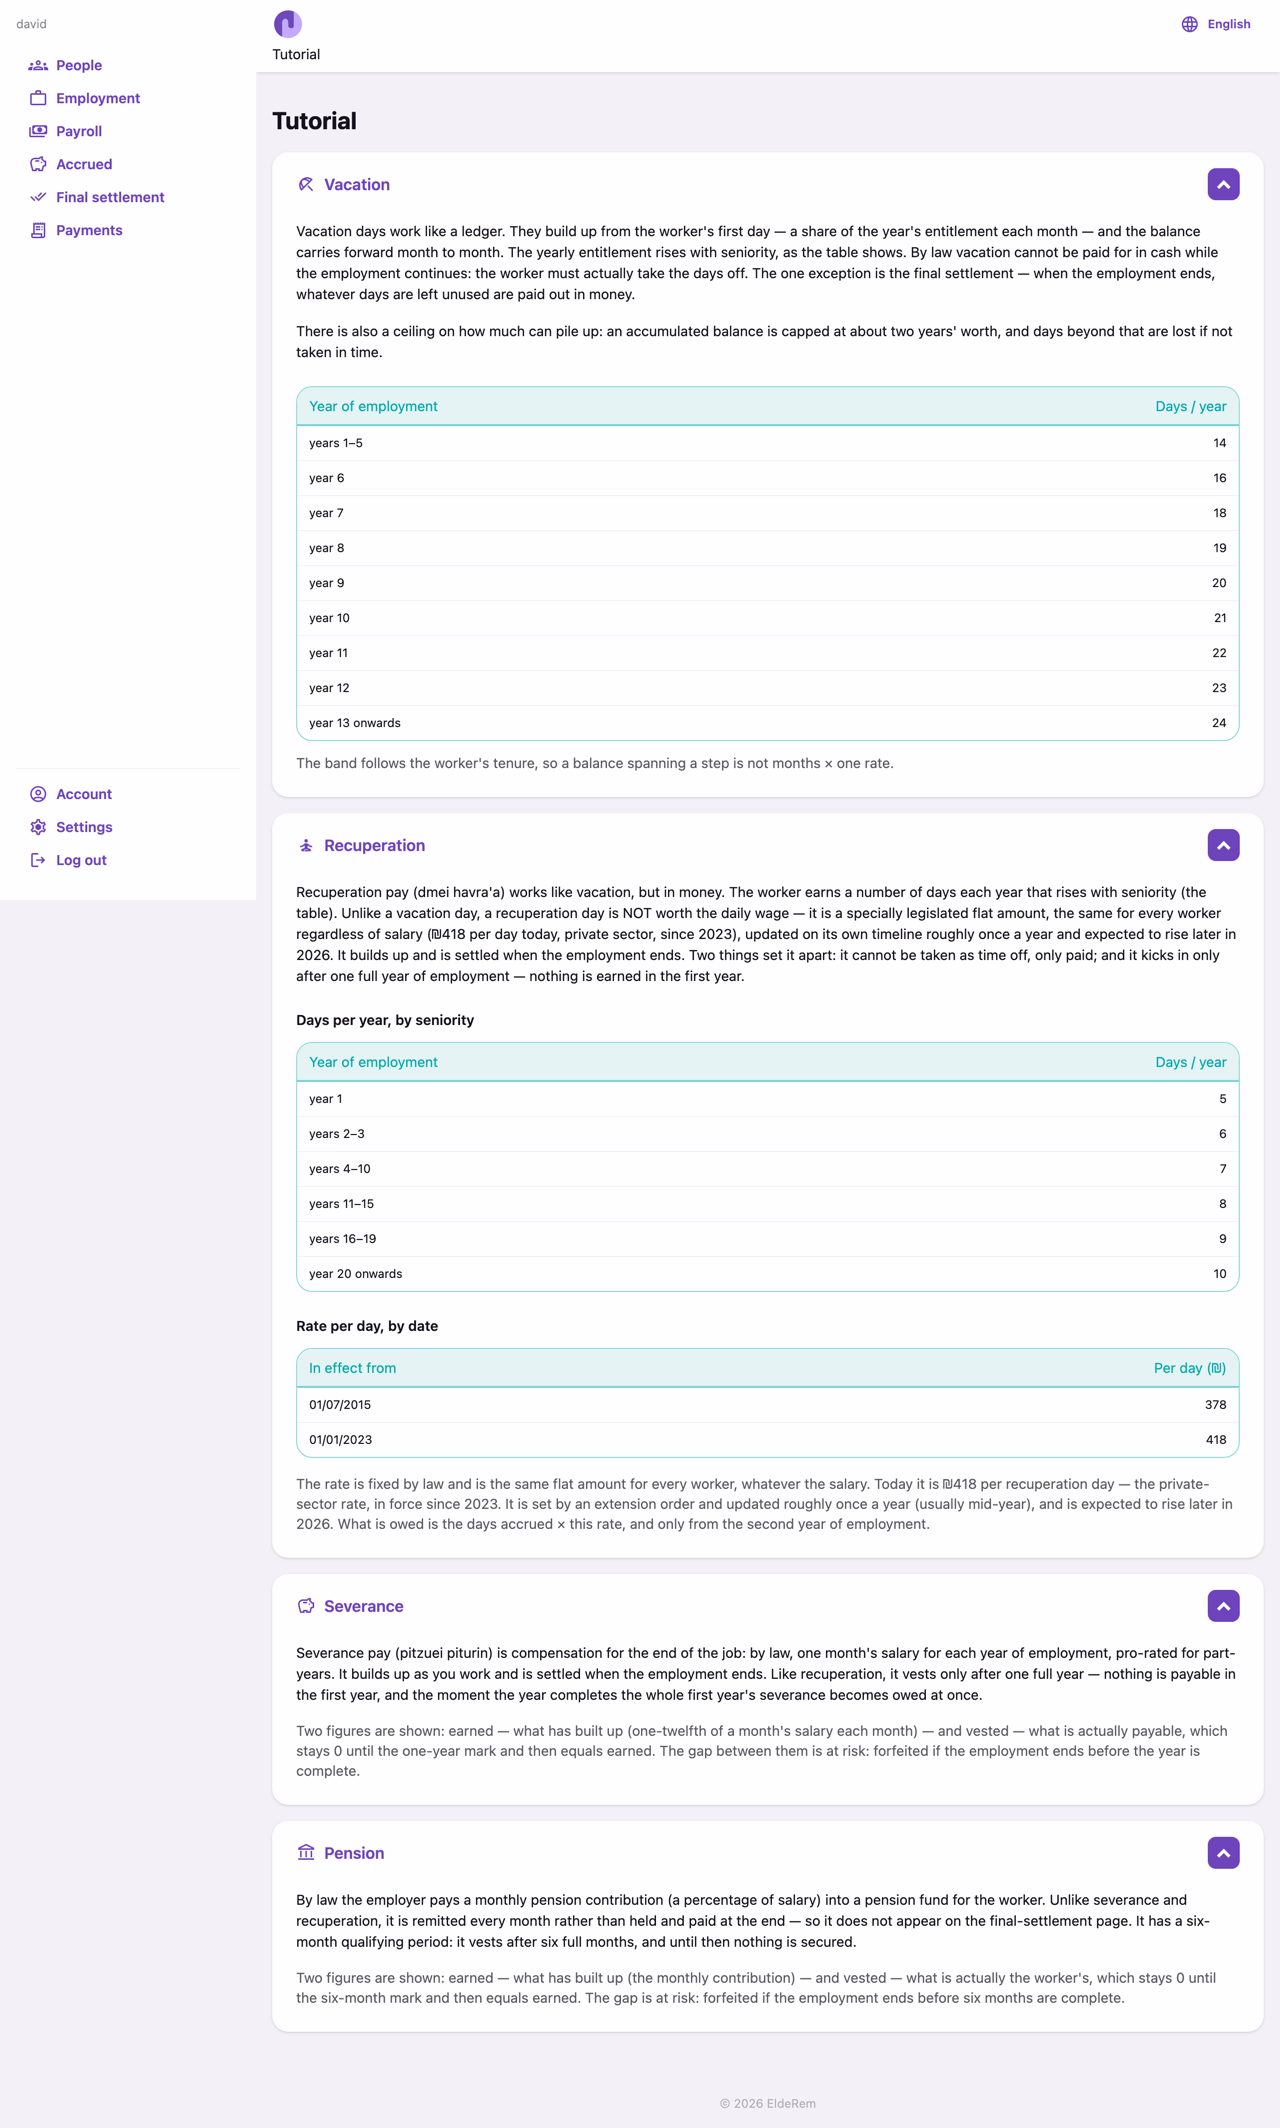
Payroll for a live‑in caregiver has a few genuinely tricky ideas — vesting, recuperation, the difference between “earned” and “what you’d actually get”. The Tutorial page collects a foldable card for each:
- Vacation — leave as a ledger that builds up and is paid out, with the days‑per‑year ladder by seniority.
- Recuperation — the flat legislated daily rate, its own history table (₪ per day by year), and the one‑year rule.
- Severance — one month per year, pro‑rated, vesting after a year.
- Pension — the monthly contribution and its six‑month qualifying period.
The same explanations appear as pop‑ups next to the features they describe: wherever you see a Tutorial button (on the Accrued cards, the payslip’s vacation card, or the settlement cards), it opens the matching card. The Tutorial is the single source of truth for these concepts.
19. Simulation Mode — Practice Safely
Turn on Simulation mode in Advanced settings and create a simulation employment. It behaves like the real thing — set terms, run payslips, settle — but is clearly marked as simulation and does not require the full legal identity details, so you can explore freely. You can finalise it even with incomplete details (the warnings still show; the document gate doesn’t block you).
When you’re ready, Clone to live turns the simulation into a real employment for a real worker (person data carries over; history does not). Use simulation to learn the app, to reconstruct a past employment to see what was owed, or to rehearse before onboarding a real worker.
20. Your Account
Open Account from the sidebar:
- The Account owner card shows your own details; View opens your person page to edit them (name, address, contact — contact changes need your password).
- The national‑insurance payer details (used for the tax data card) are set here once.
- Policy links (privacy, terms, support).
- Delete account — permanently removes your account and everything it created (people, employments, payslips), then logs you out. This cannot be undone.
21. The Whole Lifecycle at a Glance
- Sign up and choose your language. (Ch. 3)
- Create the people — you (employer), the caregiver (worker), the elderly relative (patient). (Ch. 5)
- Create the employment (draft): worker, patient, start date, region. (Ch. 6)
- Set the Conditions — salary, pocket money, deductions — and sign them. The employment goes active. (Ch. 7–8)
- Each month: prepare the payslip, adjust rest days and any extra lines, review, and Pay to record the wire. (Ch. 10–11)
- Pay national insurance monthly or quarterly. (Ch. 12)
- Watch the accruals build up on the Accrued page. (Ch. 13)
- When it ends: Terminate with an end date, review the Final settlement, add any last adjustments, and Pay the closing amount. (Ch. 14)
- Everything is in Payments as a permanent record. (Ch. 15)
22. Glossary
| Term | Meaning |
|---|---|
| Employer / Worker / Patient | The account running the job / the live‑in caregiver / the elderly person cared for (the workplace is their home). |
| Party | Any participant (employer / worker / patient) in an employment. |
| Conditions | The agreed terms for a span of time; a change is a new span. |
| Draft / finalised | Editable vs. signed‑and‑locked terms. |
| Snapshot | The frozen point‑in‑time record of everyone’s details at activation. |
| Accrued | Money or days set aside for the worker’s future, building up over time. |
| Earned / Vested | How much has built up / how much the worker would actually get if the job ended today. |
| Gross pay / Net pay | The base on which national insurance is charged / what actually reaches the worker. |
| Employer burden | The total cost of the worker (net pay plus all the employer’s obligations). |
| Pocket money (dmei kis) | A cash allowance — deducted as an advance or paid on top. |
| Accommodation deduction | Lawful charge for live‑in housing; full or half the cap by ownership. |
| Recuperation (dmei havra’a) | A statutory benefit: days per year by seniority × a flat ₪ rate; paid annually / at settlement. |
| Severance (pitzuei piturin) | End‑of‑employment compensation, ~one month’s salary per year of service. |
| National insurance (Bituach Leumi) | The employer’s contribution, remitted to the National Insurance Institute. |
| Postponed adjustment | A correction deferred to the final settlement; signed either way. |
| Final settlement | The closing payment when an employment ends. |
| Teudat zehut | The Israeli identity card (the “ID Card” document). |
23. Tips and Troubleshooting
- “Update needed” badges point at missing data. On a worker you can relax the email and address requirements in Settings.
- Can’t finalise an employment? Check the missing‑document list under the disabled Finalize button (worker passport/ID; employer & patient ID card), or turn on Simulation mode to explore without them.
- A contact won’t delete — it’s referenced by a draft or active employment. Finish or remove that employment first (finalised ones move the contact to Archived).
- The Summary total and the amount I paid differ. The Summary is a projected calculation; the amount you record on the Pay card is the authoritative figure.
- A benefit shows 0 vested. It hasn’t passed its waiting period yet (a year for severance/recuperation, six months for pension). The card’s help explains this.
- Wrong language for a worker? Use the top‑bar switcher, and add the worker’s language to their profile so the app prompts for their name/address in it.
- Long pages feel busy. Fold cards you’re not using (the fold button in each card header), or turn off inline help in Settings.